Wednesday, June 15, 2011

Bringing the Outdoors Indoors

I'm sure by now you know just how much I love nature and how much I love to invite it into my home. Not only have I used one branch as art, I used another branch as a jewelry hanger and yet another fallen tree to make a bench.  Yes, I love nature and trees and flowers.

I was perusing the large and infinite world wide web recently and discovered that there are others that are beginning to bring the outdoors in.  Branches, leaves, and driftwood all provide a neutral, yet majestic touch when used in decorating.

via

I have fallen in love with this twig lantern. It's simplicity and rustic charm are coupled with the elegance of the smooth, bare wood.

via

This lamp would be so simple to recreate with a small cylinder lamp base, some straight sticks, and twine to hold them together.  It would match any color combination and bring a dash of interest to a corner.

via re-nest

This very creative pendant lighting is beautiful and completely unexpected. If you look closely, you'll see the branch being supported in the pot with the pendant lamp cords wrapped tightly around the length of the branch.  I can also picture a branch hanging from the ceiling and supporting lighting above a dining room table.

via diy ideas

I have this picture saved on my computer and every now and then open it just to stare at it. Such a great idea to use a branch as a unique upcycled curtain rod.

via a la mode

Sunburst mirrors have been making a big splash in the blogging community and here is one that I love.  They spent hours on the beach collecting perfectly straight driftwood pieces and their result is beautiful.

I've been inspired to continue bringing the outdoors in in small but unique ways. Perhaps a trip to Goodwill is in order to find a lamp just begging to be wrapped in sticks.

Tuesday, June 14, 2011

Vacation Watering System

Summer is a time for vacations and for that I love summer.  Summer vacations, however, tend to bring up a lot of obstacles when you're new to a city and don't have any friends to casually leave your house keys with and ask that they water your plants a few times while you're gone. We just left on a road trip to see family and we had almost forgotten about the fact that we didn't have any of those old amazing friends we were so lucky to rely on for help.


Just a day before the big road trip did I remember our balcony container garden as well as my very loved houseplants.  The heatwave we've been having for the last three weeks worried me about how our plants would survive for ten days without water. I immediately went to google for some suggestions and learned that almost everyone alive has close friends to ask (at least that's what all the suggestions were on the message boards to those few loners who had no trusted friends, like us).

I guess the saying is true - necessity is the mother of invention.  Sitting down with my thinking cap, I came up with two ideas. The first was to fill empty bottles with water, stick them in the plants and allow the water to slowly moisten the soil.  I came up with this while remembering those self-watering bulbs you can buy for $10-$15 at garden stores. I decided to try it out and soon realized that, unfortunately, my idea was flawed. The opening of the beer bottle was too large and the water drained into the soil within a couple hours. That would not work with our ten day vacation coming up - we needed something that would slowly ensure that our plants were hydrated for at least a week or so.


Enter idea number two: fill the bathtub with water and place the plants on top of something that would wick the water from the bathtub into their soil.  I have a large variety of pots and plants and therefore a garden with a large amount of varying water needs. Some of the plants get upset with too much water - so I couldn't just dunk them in the tub of water.  Some other of our plants fear dehydration and beg for water constantly - so I had to ensure they'd be kept moist.


I ended up gathering up our baking dishes and placing them upside down in the bath tub.  I filled the tub until the water was slightly above some of the smaller baking dishes and not quite covering the other larger baking dishes.


I then covered them with a towel, making sure to drape the towel into the water between the baking dishes. I knew the towel would wick the water up and stay moist.


I carefully arranged our plants in the bathtub, placing them on the towel-covered baking dishes. The plants that love water I placed on the lower baking dishes that were covered while the plants that enjoy some drying out were placed on the higher dishes that were not submerged in water.

I also have a couple pots that don't have holes in the bottom. For them, I watered the soil extremely well and placed them on the edge of the tub hoping that the extra humidity from the water-filled bathtub would help them a little.


I've been keeping my fingers crossed that my plants will survive our vacation.  After starting many of them from seeds and taking in dying plants from friends and nursing them back to health I would hate to come home to a plant-less house.  I'll keep you updated on how this watering system worked, but until then, perhaps you could cross your fingers for us too?

Friday, June 10, 2011

Yellow Blossoms

I love nature. I love nature so much that last month I found a tree branch, spray painted it, and hung it up in my living room. Remember, though, how it was missing something so I whipped up some origami leaves? They were nice for a couple weeks, but then the bold, modernism made me tired so I started looking for other branch-sprucing options.  With my mind focused on flowers, both real and otherwise, this week, I decided to try my hand at paper flowers. We needed something pretty, summery, and colorful to replace the leaves and I think I found them!


I started out with some scrap cardstock and a variety of fun scissors.


Drawing a spiral, I cut it out. I got a little experimental with the scalloped scissors.  I decided I'd try a variety of made up flower techniques to see what I liked and didn't like.


After cutting out the spiral, I took the outer end piece and  started rolling. I tried the inner end piece and that didn't work very well...so stick with the outer end.


I found that if I rolled it tightly and then gently let it go when I finished, the flower blossomed very nicely


I also took a long strip of paper and cut it into fringe to roll up.


Then I used my pencil to curl the fringe down and make into a flower-like shape.


Falling in love with all the flowers I couldn't pick my favorite style so I did something bold. I decided to use them all. I know, I know. A branch with three different flowers? Let's see how it looks.


I like the yellow against the green and it's nice to bring in some new color to the blue and greens of the living room.


 Much better than those leaves! Don't worry, I saved them and may bring them back out in the fall. I'm liking the simplicity of the small yellow blooms...what do you think?

Thursday, June 9, 2011

Headless Chicken Type of Day

Picture from last week's camping trip. My happy place.

 Today is one of those days where my to do list exceeds the hours and minutes in a day and I woke up feeling stressed before my feet found their way out of the sheets and onto the floor.  Typically to counteract the stress and feeling of impending doom associated with days like these I procrastinate. You see, I am a fabulous procrastinator. I could teach classes in the art of procrastination, and yes, there is enough to teach about procrastinating that it would fill up an entire semester. In fact, I could probably teach a beginner class and advanced class.

However, today I am determined not to procrastinate. Why? I have no idea. In fact, I spent a few minutes procrastinating by trying to figure out how this not procrastinating idea came about. I ended the procrastination early before I came up with any answers.

Oh, but if you would like to procrastinate, why don't you stop by my pinterest boards and check them out! The use of pinterest for procrastination would fill an entire class or two of my Procrastination 101 course. Oh, and follow me so I can discover your awesome boards!

Wednesday, June 8, 2011

Mary, Mary Quite Contrary


Today we are celebrating flowers. Not just any flowers, mind you, but flowers that don't wilt, don't cause allergies, don't cost money, and don't go out of season. Yes, today we are celebrating pom pom flowers.  I love pom pom flowers for a myriad of reasons, among them the fact that you can choose any color under the rainbow that you want and you can dress up little corners of your house and then just forget about them.

I've had many comments about the flowers seen in this post and many more emails asking how the flowers were made. Well, hold on tight because you are about to embark on a journey of discovery and learning, my friends.

The first thing you must do and the second most fun part of this craft is picking out the color you want (don't worry, I'll get to the number one most fun in a bit).  I chose yellow and white for a simple yet summery feel.


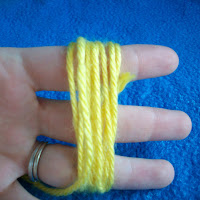
Once you've chosen the perfect shade of color, you have to decide how large you'd like your flowers. I tend to make mine a variety of sizes by altering what I'm wrapping the yarn around. I've been known to use a fork for smaller flower all the way to to my entire hand for a larger flower. Typically I alternate between two, three, and four fingers.

After deciding on the size of your flower, just start wrapping. If you are choosing to wrap around your fingers, you may want to keep them apart a little so that your circulation doesn't get cut off from wrapping the yarn too tightly.  Have fun wrapping and keep in mind that the larger the flower you want, the more wrapping you must do. I tend to like full flowers so I wrap a lot - 100-115 wraps for a small flower, 110-125 wraps for a medium flower, and 130-150 wraps for a larger flower.

When you've finishing wrapping the yarn around and around and around some more, carefully take the yarn off your fingers (or fork or whatever else you found to use) making sure to keep a finger in the hole of yarn.

You will then take the bit of string you cut previously (oh, you didn't? Don't worry, I always forget, too) and carefully push it through the hole and tie it as tightly as possible in a double knot.


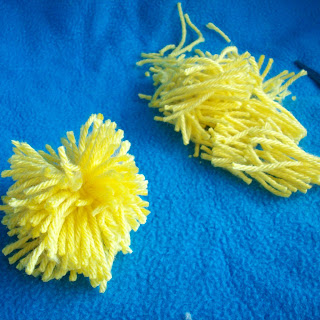
Then take a pair of scissors, place one blade in the hole and cut opposite of the knotted piece of yarn.  Don't worry if it looks like a floppy mop, you are now at the funnest part of the craft: trimming the yarn.


The trick to getting a perfect pom pom flower that isn't floppy and yarn-y is to trim, trim, trim. Never have I trimmed too much, but many times I haven't trimmed enough.


Even this guy needs more trimming! Just keep trimming, just keep trimming.


When you've finally got the little ball of fur perfect, with a dab of hot glue in the middle of the yarn ball firmly place the small twig into the flower.  I like to try and get the twig inside the center of the flower careful not to come out the other side.


There you have it - a beautiful pom pom flower.


Tuesday, June 7, 2011

How Does Your Garden Grow?

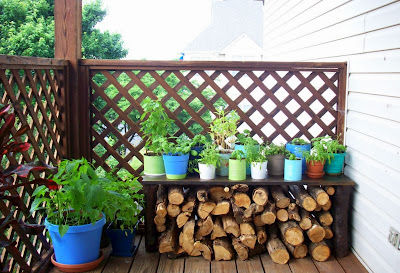
Summer is my absolute favorite time of the year. Bring on the heat, the sun, the longer days, and the festivals and fun!  One of my favorite things about our apartment is the awesome balcony we have created. It's our first balcony and boy are we making use of it! 


We bought the side table and chairs the moment we signed our lease because we were that excited for our balcony! We eat dinner out here most evenings and love watching the neighborhood kids practice their skateboarding tricks every afternoon.


It's also a great retreat from our warm apartment (we haven't turned on our air conditioner yet) once the temperatures cool at night and the perfect spot to watch summer thunderstorms.


Our vegetables are growing like crazy and the cayenne peppers have little white flowers.  John keeps checking the carrots sure that they are ready to eat but they still have about a month left of incubation.  On the left are our bell peppers that I can hardly wait for.


As you can see, I got a little zealous with my basil seed planting and now our basil has taken over our entire garden....we have 25 individual basil plants. If anyone has any delicious basil recipes, please share. We've been eating lots of basil and mushroom pizza and will be making some pesto in the next week or so.


There are also some flowers dispersed here and there - marigolds and alyssum.  They haven't started blooming yet but I can't wait until there is some color mixed in with the sea of green.


Don't forget to pass along those basil recipes! I'm off to enjoy the sunrise while sipping on my coffee out on the balcony.

Monday, June 6, 2011

A Tin Man in the Garden

As the thermometer has been inching up, I've been enjoying our balcony more and more! We've filled it with plants, a homemade bench, and a sassy chandelier and absolutely love eating meals and reading out there in the evenings.


I did go a little crazy in my seed planting (it was my first time planting seeds, after all) and my plants have grown out of control.  Hating to weed out (i.e. kill) some of the plants that are crowding my pots, I decided to just repot some of them.  Enter my need to find some new planters.  I'm sure you can guess that I upcycled some piece of household trash!

via

After glancing around the house for containers of some kind, I happened upon the canned tomatoes I was using to make spaghetti sauce.


A light spray with some spray paint plus some punched holes in the bottom and voila!  Some pretty, upcycled, free pots that are now housing my out of control basil.


I'm loving these little pots and look forward to adding more as I need to.  Different foods and brands have different rib patterns and I think an entire container garden of mix-matched tin cans would be funky and fun.  How I wish I had thought of this before purchasing all these other pots!


Stay tuned for some shots of our balcony and entire garden tomorrow!

Wednesday, June 1, 2011

Yippee!!!

via

As you read this, John and I are setting up camp, enjoying the solitude, and reveling in the cooler mountain temperatures. With the record-breaking temperatures this week paired with our goal of not turning on our air conditioning until July 1, we decided to flee the 95+ degree weather and head to the mountains for the week on a super fun camping trip.

As we're enjoying the raging Linville River and strenuous hiking trails, I will also be reaching 200 followers!!!! I can hardly believe it!!! As of right now, I'm at 199 followers, but I have faith that a kind soul with see that and snatch up the title of 200th follower (much like Little Branch Ranch did when I reached 100 followers).  There is yet again a ton of fist pumping and confetti throwing going on in my living room right now as I prepare to reach the 200's!

via

So, let me thank each and every one of you amazing followers for stopping by and reading my blog, leaving amazingly awesome, supportive, and inspiring comments and for just being fabulous!  I do think my followers are pretty freaking fabulous!  So, enough exclamation points and let me get back to my streamer twirling, arm flailing celebration party taking place in my living room!

(Gosh, I wonder how many followers I'll have when we get back this weekend? I can't wait to see!!!)

LinkWithin

Related Posts Plugin for WordPress, Blogger...