Showing posts with label upcycle. Show all posts

Thursday, December 1, 2011

Non Tree Christmas Tree

Note: This is the final post in a series of posts. You can read the following here:
Post 1: What is a Christmas Non-Tree?
Post 2: Snowflake Blizzard


We decided not to cut down a tree this year because we'll be heading to New Mexico to spend the holiday with my family for a week. It seemed like a waste to get a fresh tree and only enjoy it for a couple weeks before we head out and leave it all alone to die on Christmas Day. Instead, we decided to use the money we would have put towards the tree towards airline tickets.

Don't get me wrong, though. I love all things Christmas and that includes a Christmas tree. In an effort to save money, I decided to upcycle some things I had at home to create a Christmas Non-Tree. After picturing many different ways of creating a Christmas Non-Tree, I decided to use our tomato cage. It was the perfect shape and would be the easiest method.


After scrubbing it down and sanding some rust off, I got to work draping it with Christmas lights.


The easiest way for me to do that was draping them vertically and weaving them in and out of the metal rungs.


I then gathered my billion snowflakes and threaded them with fishing line. I made about 14 strands of snowflakes. After tying them together, I draped them over the tomato cage, arranged them carefully, and voila. A Christmas Non-Tree!


It looks beautiful lit up and reminds me of watching snowflakes drift around in front of a street light.

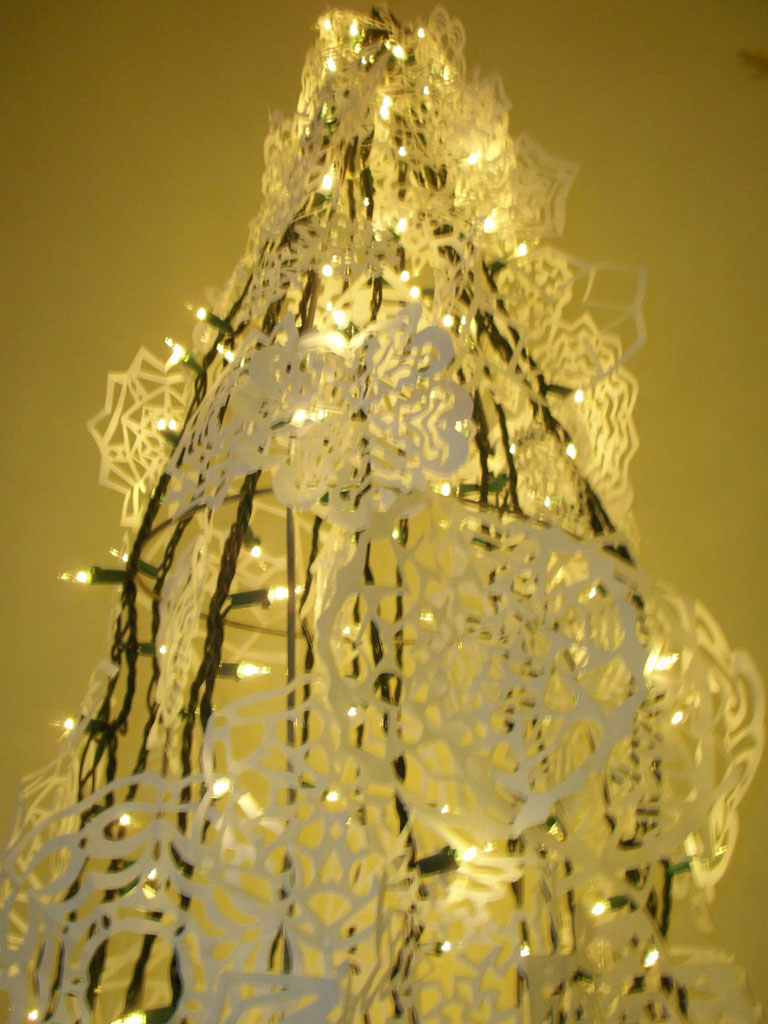
Now that we have a Christmas (non) Tree, I can finally start to get in the Christmas spirit. I still have some other minor ways I plan on transforming our home but until then I think I need to light a candle. One drawback to a Christmas Non-Tree is that it doesn't smell like evergreens. I guess you can't win them all!

Have you ever made a creative non-tree instead of going the tradition route? I'd love to hear all about yours!

Christmas Tree Day

Note: This is the first post in a series that will lead to the unveiling of our first ever Christmas Non-Tree.
For part two, go here.


Can you believe that today is the first day of December? I feel like September was just a few days ago!  Growing up, I always loved the month of December. The sparkling lights around the city, glowing Christmas trees glimpsed through windows, Christmas music playing in the stores. Such a hopeful, optimistic month filled with love and goodwill.

My family has created many many Christmas traditions and I hold each one of them dear. However, once I got married I knew I needed to create new traditions with my new little family. John and I were unable to fly home to New Mexico for our first two Christmas' which was sad and lonely, but I think it was also a way to drive home the point we are each other's family and we created amazing holiday traditions that we look forward to now.


One of the first things we did together for our first Christmas was chop down our own tree and decorate it together. That tradition, however, is going on the back burner this year. We are visiting New Mexico for Christmas and that has forced us to make some sacrifices both financially and with our traditions. We decided to use the money we'd typically spend on a tree towards our airline tickets.


Don't worry, though! That doesn't mean we aren't going to have a Christmas tree! We are simply creating a non-tree Christmas tree!  What is a non-tree Christmas tree, you ask? Well, it's a tree that is constructed from upcycled things you have at home. It's a way to enjoy the lights and ornaments and other decorations without having a tree (real or fake).

For the past week I've been cutting hundreds of snowflakes in preparation for the first ever Holt Christmas Non-Tree.  Our house is covered in little paper flakes and my fingers are bruised and sore. Our computer paper has been diminished and all I can see are tiny triangles and circles and folded paper.

By the end of the day, though, the Holt Christmas Non-Tree will be displayed for all to see. So, stay tuned for periodic updates on the snowflakes, the Christmas lights, the non-tree, and the holiday spirit!

Part two - Snowflake Blizzards

Friday, October 21, 2011

Sweater Pillow Tutorial

After showing the first sweater pillow I created, I got several emails asking for a tutorial.  Not that I needed a reason to make a second pillow...these pillows are soft and cuddly and perfect for the cooling weather.

goodwill sweater pillow tutorial diy

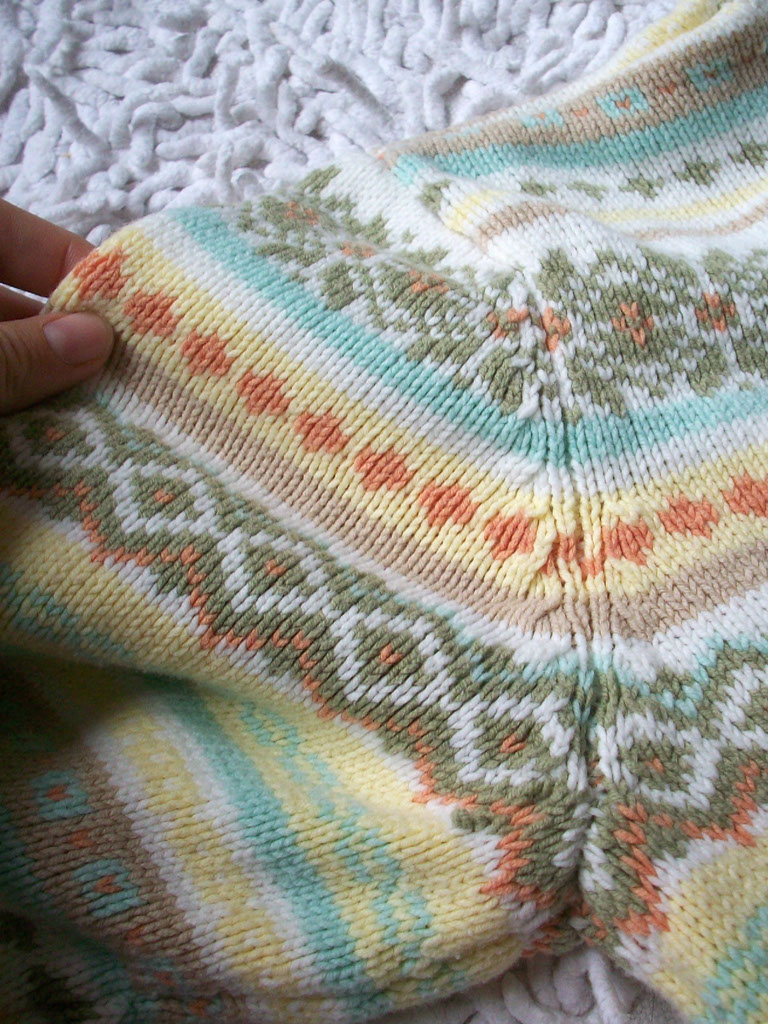
Allow me to introduce you to my Goodwill sweater. This colorful guy was tired of seeing the back of closets - with his busy patterns and unique color scheme he had little hope of making it out of that closet. Until I found him.  I recognized the greens and blues and yellows and creams that are right at home in my living room color scheme. Better yet I recognized the tans and oranges as a hint of fall that I've been looking for.  So that, my friends, is how this sweater made it home with me.

sweater upcycle pillow diy

As with all fabric I bring home from Goodwill, I washed him in hot water.  Washing and drying the sweater allows for some felting to occur. I prefer the slightly felted look - it ensures the sweater is close-knit and won't gape and show the stuffing or pillow insert. It also gives me peace of mind that the yarn won't unravel. 

sweater pillow tutorial diy

After he was dry (I put him in the dryer for a little bit and then allowed him to finish air drying), I took off the arms. I did this because the size of my pillow was going to force me to go slightly above the body of the sweater and past the arm area.

sweater upcycle pillow diy

The arms are sewed on with a long piece of yarn. It's easy to determine which yarn once you squint put on your glasses and get a good look. Using a seam ripper, I worked my way around both arm openings.

pillow upcycle knit sweater diy

Don't worry if you lose track of which yarn is the yarn you are ripping. I just skipped that section and started up again when I found a spot that was obvious.  Once you are ready to go back and work on the skipped section, it's easy to rediscover the yarn used to sew both pieces together.  You can see how I skipped a small section in the photo below.

goodwill sweater pillow upcycle diy

With the arms off, you're left with a lovely sweater vest that you may just decide to keep as it. Kidding!  But ripping out the seams, you ensure that the yarns are not going to ravel because you are keeping the knitting and its hems intact at this point.

sweater pillow tutorial diy

Now it's time to determine the size of your pillow. I wanted a 15x15 pillow which unfortunately meant that I would have to cut off some of the sides and go up into the arm area. If your sweater is larger than mine, you could just close up the bottom and the top of the sweater and call it a day!

sweater pillow tutorial diy

I used a couple pins to keep the sweater together and mark the path I was sewing along. I then changed my stitch length to the smallest length possible. I did this to ensure that I caught every single piece of yarn so that unraveling wouldn't be a problem.

sweater pillow upcycle diy

If you look very closely at the photo below, you'll see the white stitching running horizontally across the sweater. I chose to put in two lengths of stitches running parallel to each other to provide extra protection against unraveling.  Once that is done, cut your sweater.

diy cable knit pillow tutorial

Once you've completed your pillow, fluff and enjoy!

diy knit pillow tutorial

You can see my pillow needs some much needed cuddling to get the stuffing in all the right places.

diy knit pillow tutorial

My living room is slowly becoming ready for the colder months. I just need to incorporate some darker, more saturated colors (I'm thinking a hunter green and/or navy blue to darken up the color pallet) and a knitted throw.

diy knit sweater pillow tutorial

Last night this little guy was my go-to-pillow while watching television. He makes a much  better pillow than sweater, don't you think?

knit sweater pillow upcycle diy

Pin It

Thursday, October 20, 2011

Styrofoam Upcycle #4

twine photo frame diy

Last spring we were cleaning out our storage shed when we found a styrofoam cooler that was merely taking up space. Instead of throwing it away, I decided to upcycle as much of it as possible and proceeded to make a couple frames and a few awesome letters for my gallery wall (seen here and here).

diy frame upcycle

Well, that styrofoam cooler produced more styrofoam that I thought possible when I was dissecting it and I finally got around to upcycling another piece of the cooler.

twine wrapped frame diy

 I had cut out a variety of rectangles knowing I wanted to make some textured frames.  I have many frames displayed on our gallery wall, but aside from my twig art and cork heart, texture and natural fibers were missing (and we all know how much I love bringing natural fibers and organic matter into the mix)

wrapped picture frame diy

Using some hemp twine I had from a project gone bad, I began wrapping and gluing (with hot glue), wrapping and gluing, wrapping and gluing. 

twine frame diy upcycle

 I love how some of the smaller details turned out. The V pattern at the corners and centers of each long leg add additional interest.

styrofoam upcycle frame

 It feels good to create something out of what would normally be thrown in a landfill and left to blow around for hundreds of years. Instead, I have a lightweight, textured frame to add to my gallery wall.

diy frame upcycle styrofoam

I'm still deciding if I should leave it empty or add some art. What do you think?

styrofoam upcycle picture frame

Thursday, September 8, 2011

Using Goodwill Sheets for Awesomeness

sheets upcycle diy pillow

I'm not sure if you remember my very brief exclamations regarding my new found love and obsession with Goodwill sheets...they are what I used to make my rag rug and my pillow yesterday.  I'll let you in on my little secret: $2 Goodwill sheets (once washed in very hot water and dried) provide yards and yards of fabric that you can dye any color you want!!

So, after buying 4 queen and king size sheets for the rag rug, I had quite a lot of leftover fabric. Yesterday I used some that I had dyed blue for the backing of my bird printed pillow. Today I am showing a new pillow that I used a white sheet for piping and the sheet I dyed yellow.  Cheapest fabric ever!

budget pillow diy upcycle

After making my very first piping (much easier than I thought it would be!), I made an envelope case and stuffed my pillow in. That's when I realized that I made the pillow case waaaay too large. So, I plopped myself down in front of the television and spend the night ripping seams out.

goodwill sheets upcycle pillows

Luckily my ruler was behaving better the next morning (of course it was the ruler's fault!) and the second time was the charm.

diy pillow sheets upcycle

To emphasize the crisp white piping, I decided to add some white french knots to the pillow and love the texture they created.

diy pillow sheets upcycle

how to upcycle sheets


Wednesday, September 7, 2011

No More Hording Fabric

I have a minor issue with falling in love with things (girl scout cookies, the best greeting card ever, amazing fabric my mom sent me) and being scared that I won't find the perfect person to send the perfect card to or the perfect evening to scarf down the perfect cookies...or the perfect project to use the most perfect fabric on.

pillow tutorial

My mother sent me a surprise package this summer with some leftover fabric from one of her sewing projects. The moment I opened the box I fell madly in love with the print and immediately put it in the closet because I wouldn't be using the fabric for just anything - I had to find something worthy of this fabulously colorful, bird-filled fabric.

Fast forward three months and it was still sitting in my closet. I'd venture in there every once in a while to bat my eyelashes at the hummingbirds and flowers and promise to find something suitable to use it for. Last week I finally came to my senses and decided to make a regular ol' pillow with it because then I'd get to enjoy the beautiful print all day every day.

diy throw pillow

I grabbed the last of the upcycled pillows I made last spring (check out the camping pillows I made here) and went to work on an envelope pillow case.  Now that I think of it, this is the ultimate upcycled project - the pretty bird fabric is leftover scraps from my mother, the backing fabric is leftover Goodwill sheets from my rag rug project, the pillow is an upcycled old feather pillow from our bed...pretty cool!

envelope pillow tutorial

In order to make an envelope pillow case, I measured the pillow, added a couple inches, and cut out a square in the bird fabric that would be the front of the pillow.  For the back, I subtracted about six inches from one side and cut out two identical rectangles.

how to sew a pillow


After hemming the two blue rectangles on one side, I sewed the pillow together.

diy pillow tutorial

And voila!

throw pillow tutorial diy

The perfect fabric turned into a colorful throw pillow.

diy pillow

Wednesday, August 31, 2011

Ollie the Owl

I love owls. Yes, I've admitted it. However, I've loved owls since before owls were plastered all over the pages of decorating magazines or pictured on the main page of etsy.  I loved owls before they infiltrated home decor. Now that they are here, though, I am not complaining.  I have been picky, though. I've been searching for the perfect owl to place on my bookshelf. I wanted a quirky owl that reminded me of the owl from Winnie the Pooh, the tootsie roll pop commercials; basically I wanted an owl that reminded me of my childhood. After years of searching, I finally found him.


I was Goodwill hunting (nice pun, huh??) for sheets a couple weekends ago when on the shelf he called my name.  For only a dollar, how could I pass him up, the perfect owl?

John informed me as soon as I brought him home that he was creepy and weird-looking. I paid no heed, for I knew he was perfect...well, would be perfect once he was introduced to some white spray paint.

Early Monday morning after wiping him down I took him outside and sprayed, sprayed, and sprayed some more. It took five light coats to begin to cover up his natural coloring.  Not to be deterred, I kept on spraying...until I discovered the bubbling. Oh the bubbling.


I blame the humidity. The back of the can states you should paint when the temperature is between 50 and 90 degrees and when the humidity is under 80%.  After storming inside and checking weather.com I discovered the humidity was 90%. Yuck.


So, I let him dry to 24 hours, lightly sanded him and tried again.


I just finished up another couple coats of paint and am now moping on the couch.  Ollie the Owl looks worse than Monday.


At least he won't creep John out anymore. Perhaps in a week or so I'll try again.


LinkWithin

Related Posts Plugin for WordPress, Blogger...