Showing posts with label craft. Show all posts

Monday, November 21, 2011

Thanksgiving Place Cards

John and I are getting excited about traveling up to Maryland for his family's wonderful Thanksgiving blow out. When I say blow out you may think I'm exaggerating but, really, I'm not. I think the last number I heard of family members expected was around 60. We'll have every bed filled, every couch claimed and every dark corner filled with an air mattress. John's as giddy as a little kid on Christmas Eve.

Every year our little cousins are in charge of making the place cards and with our numbers that's quite a responsibility. The cards they whip up every year are always creative and fun (although we do switch around the seating arrangements right up until the meal starts...shhh).  I've been thinking about what they'll do this year and started brainstorming some beautiful but simple ideas for Thanksgiving tables that will be crowded with family members on Thursday.

via
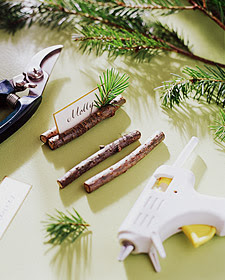
 With a simple swipe of the hacksaw these pinecones are ready to hold seating cards. What a great way to entertain the kids - send them out to gather pinecones while everyone else is busy in the kitchen. Of course, an adult would have to use the hacksaw, but what a simple and rustic addition to the dining room table.


via
 This just makes me smile every time I see the picture. There are no words for this playful name card.

via
 Another way to keep the kids occupied is sending them out to collect twigs. As with all things nature, I love bringing in the rustic simplicity of this easy place card.

via
 These may be my favorite yet. The elegance and simplicity.

via
 You know me and my love for upcycling. What a beautiful way to recycle cardboard while creating a simple but fun pumpkin place card. I love it...although to be perfectly honest, my fingers hurt just thinking of all the cardboard that would have to be cut for our 60 family members. Perhaps for my side of the family, though, where about 12 will gather to enjoy family and food it would be more reasonable.
via
I think the kids would love to paint the rocks and they bring some color and whimsy to the Thanksgiving table.

What are your family table decorations? Do you have any traditions when it comes to decorating or cooking? When I was a kid, I'd spend the night at my grandparent's house and help decorate the table for Thanksgiving. Of course, I didn't have 60 place cards to make, just a simple centerpiece and table settings to set for 12-15 of us.

Wednesday, August 31, 2011

Ollie the Owl

I love owls. Yes, I've admitted it. However, I've loved owls since before owls were plastered all over the pages of decorating magazines or pictured on the main page of etsy.  I loved owls before they infiltrated home decor. Now that they are here, though, I am not complaining.  I have been picky, though. I've been searching for the perfect owl to place on my bookshelf. I wanted a quirky owl that reminded me of the owl from Winnie the Pooh, the tootsie roll pop commercials; basically I wanted an owl that reminded me of my childhood. After years of searching, I finally found him.


I was Goodwill hunting (nice pun, huh??) for sheets a couple weekends ago when on the shelf he called my name.  For only a dollar, how could I pass him up, the perfect owl?

John informed me as soon as I brought him home that he was creepy and weird-looking. I paid no heed, for I knew he was perfect...well, would be perfect once he was introduced to some white spray paint.

Early Monday morning after wiping him down I took him outside and sprayed, sprayed, and sprayed some more. It took five light coats to begin to cover up his natural coloring.  Not to be deterred, I kept on spraying...until I discovered the bubbling. Oh the bubbling.


I blame the humidity. The back of the can states you should paint when the temperature is between 50 and 90 degrees and when the humidity is under 80%.  After storming inside and checking weather.com I discovered the humidity was 90%. Yuck.


So, I let him dry to 24 hours, lightly sanded him and tried again.


I just finished up another couple coats of paint and am now moping on the couch.  Ollie the Owl looks worse than Monday.


At least he won't creep John out anymore. Perhaps in a week or so I'll try again.


Wednesday, July 13, 2011

Crafty with Corks


As you have probably seen from my wife's posts, she is very creative with wine corks (you can see some past projects here and here).  We have saved them up over the years and she has come up with many interesting things to do with them.  I decided I wanted to give it a shot to see if I could also be as crafty with corks. 

I recently saw you could purchase a kit to make trivets out of wine corks.  This seemed a little ridiculous to me, especially when I saw the price of said kit.  I figured I may as well give it a shot and trying making a cork trivet using only the supplies we had on hand...making it essentially free. 

To start, I played around with the placing of the corks until I found a design that I thought looked nice.


I then glued a couple corks at a time to each other and clamped the corks while the glue dried.
 

*WARNING* Only use a small amount of Gorilla Glue!


Have you ever used Gorilla Glue?  This was my first time.  I have used many adhesives but never Gorilla Glue.  It's pretty great stuff and amazing at adhesion, but like I said, ONLY USE A SMALL AMOUNT.  I ended up with Gorilla Glue all over my hands and I could not get it off for at least a day.  Worst, Gorilla Glue expands as it dries and when used in excess, takes over your cork trivet project.


The glue worked quite well with the corks, however, and they were extremely secure.  Once I had the design completely glued together, I decided it needed some feet to add some additional interest and, well, feet.  I cut 2 wine corks in half lengthwise and used them as a base to raise the trivet slightly.


There we have it - a cork trivet made without a $40 trivet kit!


 - JOHN

Friday, June 24, 2011

Sticks and Stones


Given my obsession with sticks, twigs, and branches it was only a matter of time until I created another piece of art with nature's free crafting supply.  While gluing sticks together for this project I found myself contemplating about my love of dead tree limbs tree branches.  I didn't come up with an answer, but I did come to appreciate their versatility and ability to become anything you want them to (including a focal point and flowers)


My vision began with this pile of sticks on our balcony.  I sanded them lightly to create a worn look and broke them into smaller pieces.


After playing around, I found that I enjoyed the whimsical shape of the heart paired with the rustic quality of the sticks.  Simple but texturally interesting.

Sometimes I wonder if a home can have too many dead trees twigs but I highly doubt it. Nature, in any form, is beautiful.

Wednesday, June 15, 2011

Bringing the Outdoors Indoors

I'm sure by now you know just how much I love nature and how much I love to invite it into my home. Not only have I used one branch as art, I used another branch as a jewelry hanger and yet another fallen tree to make a bench.  Yes, I love nature and trees and flowers.

I was perusing the large and infinite world wide web recently and discovered that there are others that are beginning to bring the outdoors in.  Branches, leaves, and driftwood all provide a neutral, yet majestic touch when used in decorating.

via

I have fallen in love with this twig lantern. It's simplicity and rustic charm are coupled with the elegance of the smooth, bare wood.

via

This lamp would be so simple to recreate with a small cylinder lamp base, some straight sticks, and twine to hold them together.  It would match any color combination and bring a dash of interest to a corner.

via re-nest

This very creative pendant lighting is beautiful and completely unexpected. If you look closely, you'll see the branch being supported in the pot with the pendant lamp cords wrapped tightly around the length of the branch.  I can also picture a branch hanging from the ceiling and supporting lighting above a dining room table.

via diy ideas

I have this picture saved on my computer and every now and then open it just to stare at it. Such a great idea to use a branch as a unique upcycled curtain rod.

via a la mode

Sunburst mirrors have been making a big splash in the blogging community and here is one that I love.  They spent hours on the beach collecting perfectly straight driftwood pieces and their result is beautiful.

I've been inspired to continue bringing the outdoors in in small but unique ways. Perhaps a trip to Goodwill is in order to find a lamp just begging to be wrapped in sticks.

Tuesday, May 24, 2011

Upcycling Project: Part 2

Remember a long time ago when I shared that instead of throwing away a styrofoam cooler, I was trying to upcycle every inch of styrofoam from it? Well, let me show you some more projects I made from it!

As I've been sharing, John and I are trying to fill out our re-hung gallery wall (it will be revealed this week, I promise!) and I thought I'd see how well styrofoam worked as a homemade frame.


I love the way this frame turned out: it's rustic, imperfect, and beautiful in my mind.  I took some recycled wrapping paper and mod podged it onto the styrofoam circle, then cut out of cardstock a mat and framed a printed out picture of a bird.  I love it.


Here's another frame I made - this time I tried paper maching it to add strength and texture.  It only needed one layer of paper mache and it became much stronger.  Add some paint and voila!


Stay tuned for a few more styrofoam upcycling projects! I'm a little in love with this cheap, light-weight material that does not belong in a landfill and cost me absolutely nothing.


Check out the Into Our Linky Parties button to see where I'm linking up, like at Today's Creative Blog .

Tuesday, May 10, 2011

For the Love of Corks and Memories

The outpouring of comments on my heart made out of corks was amazing - it seems as though all of us has caught the cork love bug.  We all seem to agree that corks in a jar or vase or hurricane is easy and simple, but we dream of other uses for our precious wine corks.


If you look closer at our vase or corks, you'll notice something different...the writing.

A few years ago John and I started writing on our corks.  Whenever we opened up a bottle on an occasion we wanted to remember, we'd write the date and occasion on the cork and them plop it in a special vase.  Over time we've collected quite the variety of corks and memories and it's so much fun to peruse them from time to time and remember special times with family and friends or special days in our life.


Some occasions are typical such as our first wedding anniversary and a birthday dinner (complete with lobster made by John).  Others are times we wanted to look back on and smile like an evening of games with our neighbors, a dinner with our parents, or the night John finally made the big decision of where he wanted to go to graduate school.  Then, there are the times that I love reading about the most - the night I was so grumpy it was funny, the first time we made stir fry without fighting, our first night in our first apartment, a much needed lazy evening after John's first wave of grad school exams.


These are the corks I love the most...the ones that conjure up vivid memories of special times and everyday moments.  As we continue to add a cork here and a cork there to our special vase, I find myself looking forward ten years when we still have something to remind me of that evening John made creme brulee, the night we slept in front of the fire, and the day we decorated our first Christmas tree.


You can see where I regularly link in my linky parties tab, including Today's Creative Blog

Monday, May 9, 2011

Five Minute Art Alert

Welcome to another episode of Five Minute Crafting with Kristen (see episode 1, episode 2).  We've been slowly adding to our gallery wall (an updated reveal is coming soon) and while watching a movie last night I decided to whip up some new five minute art.


Using some scraps of pretty paper, I cut out butterflies and glued them onto a painted cardboard lid.  Voila!


This has been another episode of "Five Minute Crafting with Kristen."

Friday, May 6, 2011

Upcycling Project: Part 1

So, what do you do when an old styrofoam cooler is about to get thrown out? Use as much of it as possible for some crafty projects, duh!


We were cleaning out our closet and ruthlessly throwing things away when we happened upon this styrofoam cooler that was very nifty but rarely used. Hating to throw styrofoam away, I put it aside with the intentions of using as much as possible in some projects. 


For the first of many projects, I decided to make some letters (more accurately, an H and ampersand).  I printed templates out, taped them down and used a knife to carve them out.


I decided to use some beautiful paper scraps I had (which I have plenty of because I have a problem with throwing away scraps of pretty paper) to decoupage the H.


An easy-peasy, cheap, upcycled project! Stay tuned because there's more styrofoam where that came from...way more.  Perhaps there may be some paper mache-ing involved...and a frame or two...who knows.

Monday, May 2, 2011

Balcony Chandelier


diy chandelier

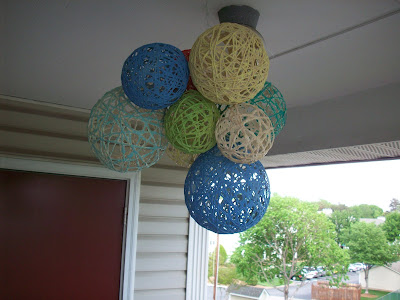
Today I'm going to be showing you my balcony chandelier.  I have been cleaning up our balcony and preparing it for summer dinners, wine drinking evenings, and stargazing nights that will begin taking place as the weather warms up.  This chandelier will bring life and party to my teeny tiny "backyard."  Oh, and it follows my philosophy of easy, quick, and budget-friendly...I spent $0 on this little diy and I'm sure you have every material in your house, too!

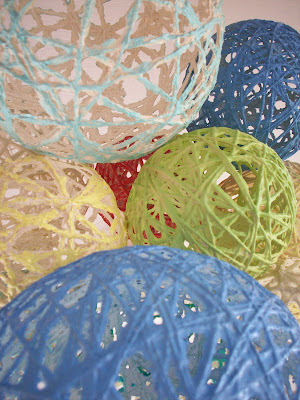
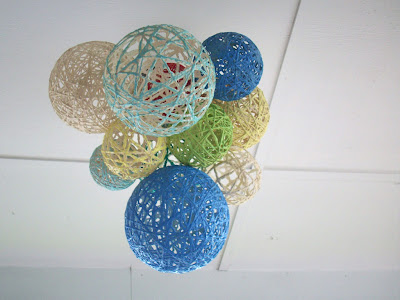
My chandelier is made up of eleven different sizes of string lanterns in a variety of fun colors that have been grouped together to hang from the center of the balcony ceiling.  Are you ready to see some exciting and educational pictures that depict the crafting mania that surrounded the chandelier? I thought so!

yarn lantern chandelier

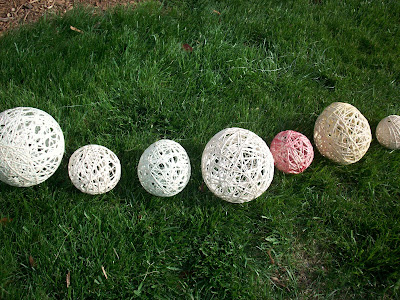
This entire messy project can be summed up as paper mache with string. Notice I mentioned messy. I think this project was the messiest project I have partaken in (well, besides the oil-based primer nightmare that I don't like to think about)...so beware!  To make the ooey gooey paste, you will need to mix together two cups of flour, 1/2 cup of elmers glue, 1/2 cup corn starch, and enough water to make a thick but slightly watery paste.  Remember, the flour is what will be the main character in creating a rock solid lantern so don't water it down too much.

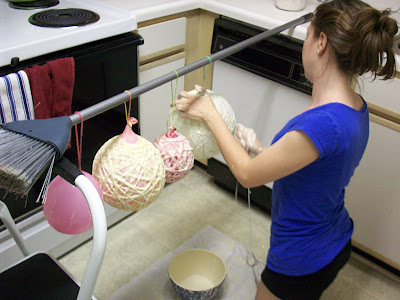
The next step is to hang blown up balloons somewhere where you can make a mess. I hung them from a broom that was balanced on a stool and the kitchen counter.  Here comes the very first messy step: you will need to coat the balloons with either petroleum jelly (did this for my first batch and turned out well) or cooking spray (did this for my third batch and it worked excellent).  This step ensures that the rock solid paste only sticks to the yarn/twine and not the balloon. I skipped this step on my second batch and bad things happened once it had dried.

how to make a yarn lantern

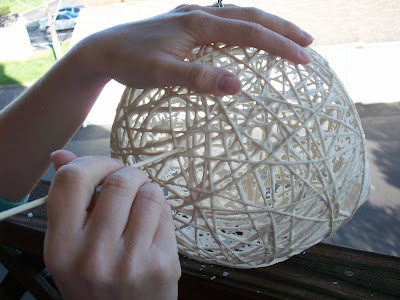
Now, grab your string/twine/yarn and start dipping into your mixture and wrapping. I found that I could put a handful of twine in the bowl at a time, swish it around, and slowly wrap without creating a knot.  I started winding top to bottom until I worked my way around the balloon, and then wrapped side to side. Feel free to wrap as much or as little as you'd like. I did a variety of amount of yarn and each lantern came out beautifully.

twine lantern chandelier

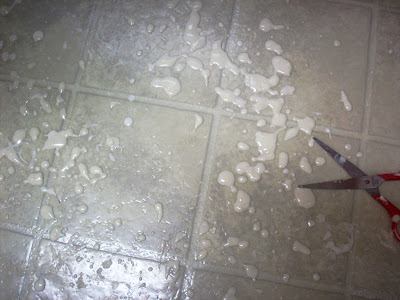
Like I said before: you will make a mess.  Even if you put down cardboard or a trash bag or your dog, splashes of ooey gooey gunk will splatter on your counters, your floor, your legs, and even your hair.

how to make a twine lantern

Now comes the hard part - let it dry for 24 hours. This does not mean 12 hours (I tried) nor does it mean 19 hours (I tried this, too).  The longer you wait, the stronger your lantern will be. When I messed with it too soon more bad things happened.

yarn lantern chandelier

After your 24 hour drying time, you get to pop the balloon! Do this outside because when you pop it, shards of dried ooey gooey hard stuff will explode like a party with confetti. The following step is my husband's favorite: use your finger or a stick or a small knife and start poking the dried crystalized goop that formed between the yarn.  Oh, and look below for a show and tell of what happens when you don't use an oily coating on the balloons. Told you - bad stuff.

how to make yarn lantern chandelier

Next, spray the lanterns with a clear protective coating; I used Rustoleum Clear Coating Spray.

diy twine lantern chandelier

In order to create a chandelier out of the lanterns, I tied fishing line to each one, knotted them together just so and hung them from a hook in our ceiling.  Holding them up in front of our mirror to see how they looked was a lot easier than getting on and off our step ladder to view the mess of lanterns, just fyi.

diy yarn lantern chandelier

I think all white lanterns would make a beautiful chandelier, but I wanted a festive feeling for our balcony so I made mine with colors reflected in our potted garden.  Colored yarn worked well but created a muted color even when the original yarn was bold and loud.  Spray painting and using craft paint worked well also and resulted in bolder colors.  The two white lanterns you see are the natural twine color. 

make a yarn lantern

One last piece of advice - make more lanterns than you think you'll need. I started with just five and they looked pitiful. I made another three but even eight didn't create the focal point I was looking for. Eleven was the magic number.

diy colored yarn lantern chandelier

I can't wait to finish up our balcony projects so we can relax and enjoy the summer from our little teeny "backyard".

Editorial Note: Here's yet another big THANK YOU to Jessica for having me over at My World - Made By Hand!


To see a list of who I regularly link to, including Today's Creative Blog, please visit  Into Our Linky Parties

LinkWithin

Related Posts Plugin for WordPress, Blogger...