An amazing video...simply amazing.

Thursday, April 7, 2011

Once a DIYer, Always a DIYer
 |
| DIY requires half business casual half pajama |
So, I did what any diyer would do: shrugged my shoulders, rolled up my sleeves, and got my hands dirty. I knew you all would understand exactly why I started tinkering with html code when I don't know the first thing about the language. I knew you'd nod your heads when I complained that I couldn't get Picasa to do what I wanted, so I went into Microsoft Word instead. I also knew you'd chuckle when I told you I must have redone my settings two billion times and I still don't like it but will keep tinkering until I get it right.
So, thanks to those who chuckled yesterday when you noticed I was working on my site and trying out new things. Thanks in advance to those who will continue to see things changed, then put back, then changed again.
While my sleeves are rolled up, here are some links for you:
I want these hanging around my bedroom...
If only I could do my hair like this...
These warm fuzzies would be a lovely little gift...
Do you love melted wax as much as I do?
In case you don't go through all your firewood this winter...
Wednesday, April 6, 2011
A Special Thank You to YOU
 |
| spotted on Tony Newlin |
As a brand new blogger, I knew nothing about blogs when I started back in February. Wait, who am I kidding - I still know nothing about blogs. I've been learning as I go and making slight changes almost daily. With so many wonderful bloggers out in the blogging world, I didn't know what to expect when I started Turning a House into a Home...but 49 followers definitely surpassed my expectations.
I know, I know...49 followers? It's not that impressive when you look at other blogs, but for me, it's something. So thank you to each and every one of my readers and followers. Thank you for all the comments you leave and thank you for encouraging me.
Let's see how long it will take me to get to 100 followers! Anyone care to help me out?!
-Kristen
Cheap Art is Better Than Cheap Wine
Believe me, I've tried them both...many times!
When trying to fill my house with art, I have had to think outside theframe box. As much as John and I love art, our wallets don't permit us from buying every original piece we fall in love with. If we did that, we'd have to trade yummy wine for cheap wine and then we would be too sad to notice the art-filled walls. Instead, I've gotten creative as I've worked to keep our walls and apartment from feeling bare.
Top 10 Way to Fill Your Home with Art:
 1. Local artist shows are a great place to find some beautiful but cheap art. This cost $20 and I love it.
2. Original art.is a wonderful way to showcase your creativity and create something you're proud of for free. The round mirror was a Goodwill find that I painted and then sketched this cute guy. The silhouette is one I drew of our family to place in the cardboard frame I made.
 3. Use a sheet of pretty paper (you can get this at Michaels for $.13), frame it, and voila!

 4. We have lots of beautiful post cards and greeting cards framed in our gallery wall. The yellow one was sent to me by my great grandmother and the purple one is something I picked up in a bookstore.
 5. Get creative - we collect fortunes and decided to take some and display them by gluing them onto a photo mat. You could also frame magazine or book pages.
 6. Old calendars are a great place to find cheap art! This was in a 2001 Monet calendar from college.

 7. Nature is a perfect place to look for beautiful decorations and art. I have a framed four-leaf clover I found as a kid and sea shells and rocks from the project I wrote about here.
 8. Displaying photos is a wonderful way to fill frames and remember great experiences.
 9. Love notes. Enough said.
 10. Wedding memorabilia is found here and there throughout our home. We paid an arm and a leg for the photographer and the special day so I want to ensure we display our photos!
Does your budget not allow for a gabillion frames? Simple! I've also used cardboard to make a frame (and then you can simply mod podge pretty paper over it) and used cardstock to make my own mats.
Creating and collecting art doesn't have to break the bank. You simply need to look around and get creative. After all, the silhouette of our family is the one of the pieces of art that makes John the most happy...and it was completely handmade, frame included.
When trying to fill my house with art, I have had to think outside the
Top 10 Way to Fill Your Home with Art:

 |  |


Does your budget not allow for a gabillion frames? Simple! I've also used cardboard to make a frame (and then you can simply mod podge pretty paper over it) and used cardstock to make my own mats.
Creating and collecting art doesn't have to break the bank. You simply need to look around and get creative. After all, the silhouette of our family is the one of the pieces of art that makes John the most happy...and it was completely handmade, frame included.
Tuesday, April 5, 2011
Spicy Chicken Stir Fry aka No Fight Stir Fry
John and I love intense, spicy flavors! John and I also love to cook together. You would think this would be heaven.
Unfortunately, each time we attempted to make a stir fry dish (the perfect way to cure your spicy, gingery craving), we would end up in a big fight. After several botched evenings that originated with a stir fry idea and ended with boxing gloves, I realized the correlation between stir fries and fights. That was a sad realization and we decided to put our dream of perfecting a stir fry recipe on hold.
Fast forward three years and one night our bad memories, craving for spicy ginger, and hunger got the better of us and we decided to cook some stir fry. Not only was it the best stir fry we'd ever made, but we also had a lot of fun cooking it together. The recipe was immediately donned, "No Fight Stir Fry."
This recipe is a staple in our house and a crowd favorite. We cook it when we have a bunch of vegetables that need to be used, we cook it when we don't have any fresh veggies but some frozen in the freezer...we cook it when we're craving spice and adventure, we cook it when we're feeling bored and uninspired. To be honest, we cook it every single week.
Onto the step-by-step directions!
Combine all sauce ingredients in a bowl (see below recipe for complete ingredient list) and add chopped chicken. Let marinate as you cut up all the vegetables (unless you are feeling lazy - when we are, we use frozen mixed veggies).

Chop chop chop!

Each vegetable has it's own bowl because they go into the wok at separate times.

Heat wok over medium-high heat. Toss chicken into wok reserving the liquid for later.

Cook chicken for 2-3 minutes and remove from wok.

Your wok will look like this. We've learned that if you don't clean it with a damp cloth, it will get very tacky, burnt and gross.

Your vegetables are next - put the firmer vegetables in first. We always cook the bell peppers and carrots for three minutes or less, then add in the broccoli and mushrooms for another two minutes.

Once the vegetables are cooked (but still crispy!!!!!), pour the saucy mixture you saved as well as the chicken into the wok. Stir and let them get all cozy together. Bring sauce to boil, reduce heat, and let simmer for 2-3 minutes.

Serve with rice and you'll be going back for seconds and thirds!

Spicy Chicken Stir Fry aka No Fight Stir Fry
Ingredients
sauce
1 cup water
1 cup low-sodium soy sauce
4 tablespoons brown sugar
3 tablespoons corn starch
2-3 tablespoons grated ginger (more if you're brave)
3-4 cloves of garlic (more if you're adventurous)
2-3 tablespoons crushed red pepper (more if you're spicy)
2 tablespoons sesame oil
1 tablespoon cooking oil
1 pound chicken breast, cut into bite-size pieces
3-4 cups of a variety of vegetables - our favorite combination is red bell pepper, green bell pepper, mushrooms, broccoli, carrots
Directions
Combine all ingredients to make sauce, whisk and marinate chicken for 30-60 minutes. While chicken is marinating, cut all vegetables into bite-sized pieces. Place wok over medium-high heat. Heat cooking oil and add chicken (reserve all liquid for later). Cook chicken 2-3 minutes and remove from pan. With damp napkin, wipe wok clean. Add sesame oil to wok and heat. Add bell peppers and carrots and cook for 3 minutes. Add mushrooms and broccoli and cook another 3 minutes. Add chicken and sauce liquid and bring to a boil. Reduce heat and simmer uncovered for 2-3 minutes.
Serve atop bed of rice.
Linking up to:
Tip Junkie
Today's Creative Blog
I'm Topsy Turvy
Monday, April 4, 2011
Pinprick Greeting Cards

I'm the type of person who must give the recipient the perfect greeting card. By perfect I mean I'll spend 45 minutes reading every card and trying to pick out the one with the right kind of humor, the right sentiments, the right conveying of emotion. For me the card is the most exhausting part of the present-giving process.
Last week I was home packing up some birthday gifts to ship around the world and realized I didn't have cards for them. Feeling a bit tired, I balked at the idea of heading to Target to search for the most fantastic cards I could find...so, instead I decided to make my own.
I wanted something more elegant than simply writing "Happy Birthday" in sharpie marker so I decided to try the pinprick technique. What resulted was a card that surpassed my envision and became something I was proud to ship off.

I had some shimmery cardstock in the closet (I can't even remember buying this!) so I traced a card I had and cut out the cardstock.

Then, I went into my word document program and typed my greeting...and then spent some time finding the perfect font. After printing it and cutting it out, I taped it backwards into the inside of the card.
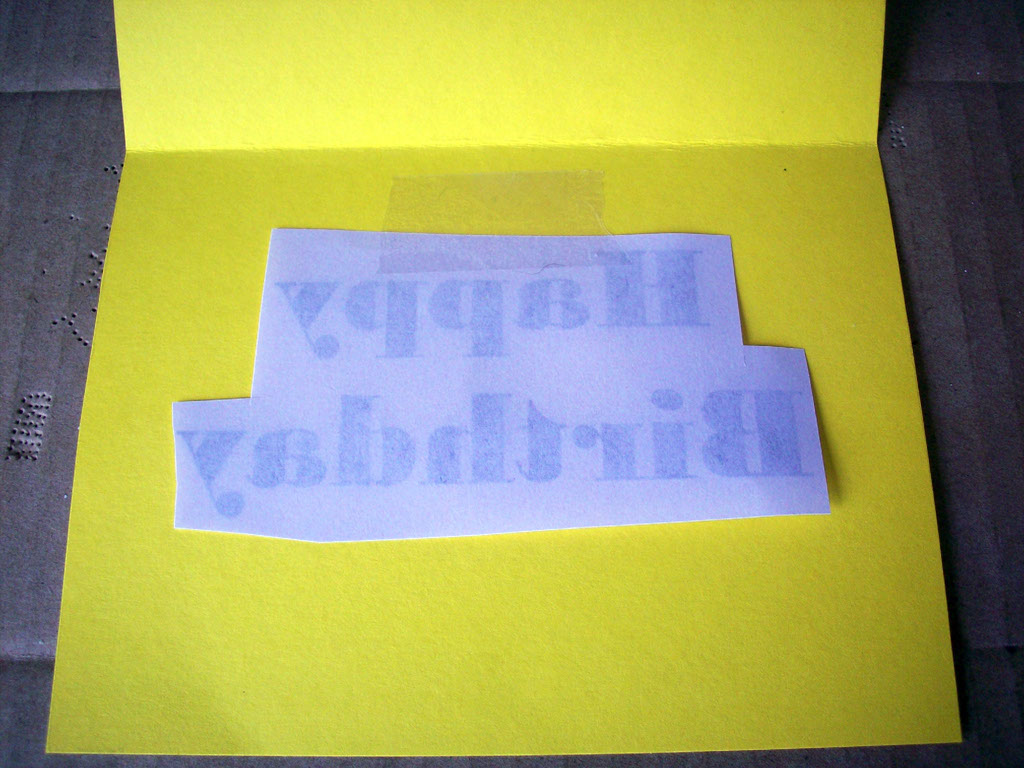
Now comes the fun part. Get a piece of cardboard, lay your card down, and start pricking holes with a pin.

Once you're done, take the stencil off and admire your piece of art.

I experimented with using skinny and bold fonts. With the bolder fonts, I tried filling in the whole word with pricks (looked a little messy and I placed my pricks too close together) and outlining (works best with larger size fonts).

Have fun with this and get creative! Use bolder fonts and outline the letters, pinprick a bunch of curly cues, or outline two birds on a branch.

Friday, April 1, 2011
Partying Blogger Style
As a brand new blogger, I've been slowly getting to know the blogging community (a big shout out to my loyal followers and commenters) but I'm anxious to get to know even more of you and introduce you to my little space on the big world wide web.

Thank you 5 Minutes for Moms for throwing the Ultimate Blog Party with the fabulous goal of meeting wonderful and fabulous fellow bloggers.
If you're stopping by from the rocking party, welcome!
This blog was created as a place to document the budget-friendly ways my husband and I were learning to turn our house into a home for our family. You can learn more about my family on my Into Our Family. A list of our DIY and craft projects can be found on our Into Our DIY World page. Don't forget to check out the sidebar for a quick glance at my top crafts such as Paper mache birds and paper crane mobile.
Please make yourself comfortable as you explore...oh, and very nice to meet you!
Kristen
PS If you like what you see, please comment and/or follow me.
News Flash: Musicians like Music
When I dated my husband I knew he liked music. When we got married, I realized he loved music. He has octillions trillions thousands of songs downloaded on his computer as well as centillions (yes, real word) hundreds of CDs. When you have as many CDs as he does, I did what any new wife would do...I packed them all in some boxes and hid them away from sight.
This arrangement has worked for two years but poor John has to dig out the boxes and search through all the CDs to find the one he's looking for. See, the thing is I hate CD racks. I think they look dinky and awkward and really, where do you put them in your home? Nowhere. I'm a horrible wife....but my brain gears have recently been moving and I've been thinking about building a nice looking CD shelf for our septillion (real number - has 24 zeros) CDs.
I'm absolutely loving this rotating bookcase. It would hold our whole collection of CDs without taking up too much space. Plus, the bright colors make me inspired and hopeful that it won't end up looking like a simple rack-o-CDs.
I've been wanting to invest in some larger, cohesive bookshelves and these allow you to mix both books and CDs. I like the thought of combining them to create one big collection display.
Another option for a rotating bookshelf. I can see us reproducing this DIY-style.
This CD holder looks upscale and doesn't give the dorm room vibe. Not sure where we'd house it though - we have enough large pieces of furniture in our office with the double desk and bookcases.
Until we discover the answer, the CDs are safe and sound and, most importantly, hidden from sight in their falling apart moving boxes.
This arrangement has worked for two years but poor John has to dig out the boxes and search through all the CDs to find the one he's looking for. See, the thing is I hate CD racks. I think they look dinky and awkward and really, where do you put them in your home? Nowhere. I'm a horrible wife....but my brain gears have recently been moving and I've been thinking about building a nice looking CD shelf for our septillion (real number - has 24 zeros) CDs.
 |
| PBTeen |
 |
| I New Idea Homepage |
This is very unexpected and works as a piece of art as well. I'm loving how interesting it is but it just won't hold our CD collection (biggest holds 120 CDs).
 |
| Ikea |
 |
| World Trades |
 |
| USHomeFurnishings |
Until we discover the answer, the CDs are safe and sound and, most importantly, hidden from sight in their falling apart moving boxes.
Subscribe to:
Posts (Atom)
LinkWithin
