Thursday, April 21, 2011

Apartment Gardening

Living in an apartment has some drawbacks when it comes to growing plants. In our last apartment we didn't have a balcony, but our abundant windows faced west and we were able to make due with small pots of herbs on our window sills.  This year we moved into an apartment that has a great balcony...of course the drawback this time is the northeastern direction it faces. I guess we can't win but we can make due because that's the mantra in apartment living.

We are excited to try growing a vegetable garden for the first time ever this year!  We started carrots, bell peppers, cayenne peppers, and lettuce out as seeds and they are all growing quite quickly!  In an effort to be green and stay on budget, I fashioned some seed pots out of toilet paper rolls. They worked really well and I loved being able to just peel the paper off easily when it came time to plant the seedlings in larger pots. I always struggle with breaking roots when I pull teeny seedlings out of pots.

DIY seed pots
I will definitely be using toilet paper rolls next year to start seeds! They worked wonderfully!

Lettuce
Our young lettuce when it was just starting to sprout....look at it now!

Our lettuce today
It's amazing how much more lettuce we find ourselves eating now that we have it growing on our balcony. I can't wait for the rest of the vegetables - we'll be the healthiest people ever.

Carrots

I'm worried that we have too many carrots in too tight of quarters...what do you think?

Peppers

I can't remember if these are cayenne or bell peppers. Guess it'll be a mystery!

Basil

Basil and I don't get along too well. Typically within a couple weeks of growing it it dies horrifically. I'll keep you updated on this little guy.


I can't wait until we get our balcony cleaned up and pretty...now if we could just do something about the excess firewood we have.  We do have one thing planned for some of it - stay tuned for a bench we are building with some leftover firewood!

Wednesday, April 20, 2011

Eggs-traordinary Candles: A Tutorial

egg candle

Question: Why did the chicken cross the road?
Answer: To fill his shells with wax!

 I'm sorry, I never claimed to be a comedian...back to our regularly scheduled program.  As a child my favorite holiday was Easter. I loved everything about Easter from dyeing eggs and sleeping in curlers to the church service and Easter brunch.  Many changes in my life have altered my current Easter traditions and I've spent several years feeling blue (a pastel-y blue to match Easter, however).  This year I decided to embrace our current situation and simply make some new Easter traditions that I can love as much as the old.

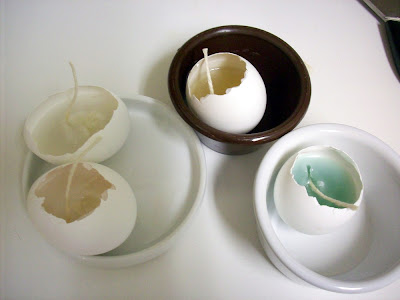
I got a little experimental with some new Easter crafts and decorations...such as the eggs-traordinary candles!  I've been wanting to do something new with egg shells, something different than dyeing them or tissue papering them so I made them into candles.  I was inspired by some ceramic egg candles I found and I think they turned out well.  It was also a way to get rid of some nasty old candle bits that have been hanging out for way too long.

In order to gather the necessary egg shells, I made breakfast for dinner.  Instead of cracking the eggs, I carefully pricked a hole into the shell with a knife.

egg easter craft

After gathering up some candles that had seen better days I placed them in a pot of shallow water and brought it to a boil. It doesn't take too long to melt the wax - the less there is the faster it takes, of course.

diy candle and egg

With a pair of tongs and some oven mitts, I carefully lifted the candle holder out of the water and poured the wax into an egg shell.  You'll notice I used little bowls to keep the eggs upright so they wouldn't wobble all over the place.  You shouldn't cry over spilled milk, but you should cry over spilled wax. Believe me.

egg tealight

For the wick, I took some twine, knotted the end, and soaked the whole thing in melted wax before placing it into the liquified candle.

make a candle with eggs

After the wax hardened completely, I bent some paper clips into round shapes and glued them onto the eggs to keep them sturdy and stable.

how to make a candle with easter eggs

I think these would be beautiful dyed and filled with white wax.  Or kept white and filled with bright, colorful wax.  I still have time before Easter...perhaps an omelet is in order...

diy easter egg candle


Check out the Linky Party tab to see the awesome parties I link to regularly.

Tuesday, April 19, 2011

So in Love with Pinterest

My name is Kristen and I'm a pinterest-aholic.  For the past two weeks, I feel as though all my spare time (and not so spare time) has been dedicated to drooling, dreaming, and lusting after the images I find on Pinterest. 


Before I share my Pinterest with you, I want you to know I'm not liable for loss of productivity or anything that may come from loss of productivity (my husband has had to pick up the dinner-making slack since pinterest has come into my life). 

Are you ready for an amazing world of beautiful pictures, amazing ideas, and jaw-dropping homes? Then enter Pinterest, my dream world.  There is also a link on my sidebar to my page.

Decoupage Collage

Last summer I bought several plastic pots from Target's clearance section. You can't beat $.60 for a pot, right? Fast forward a year and after the harps stopped playing as my irrational head-over-heels love for the cheap pots faded, I realized how ugly they are.  I haven't filled them with anything because I didn't want them in my house.  So, what began as a bargain 60 cents (times four pots) ended up being a waste of 60 cents (times four pots).

Well, I in the midst of a horrible case of DIY ADD (you should read all about the symptoms of this crafty virus to ensure you haven't caught the germ), I decided to do a little makeover.  Mod podge plus pretty paper plus paint equals awesome pot makeover. Really!

decorate plant pots

Thanks to my insane inability to throw away scraps of beautiful paper, I was able to make a collage of sorts on the pot.

decoupage pots

With all the random blank spots, I simply painted on my new favorite color of craft paint (Bird Egg) and voila!

decorate plant pots with decoupage border=

I started these flowers from seeds and now I can't remember what type of flowers they are. Guess we'll be surprised when they bloom!!


Check out the Linky Party tab to see what parties I link to regularly!

Monday, April 18, 2011

DIY ADD

That is one abbreviation-filled title....but I digress...

Do you suffer from DIY ADD? This debilitating virus strikes crafters of all kinds and results in loss of production and an increased likelihood of a messy home, forgetfulness, and feelings of being overwhelmed.  Some doctors describe the biggest symptom simply as, "running around with your head cut off."  One is most likely to catch this virus when working on a large project, a boring project, or sometimes just a project.  Though DIY ADD, like all viral infections, is unable to be treated there are ways to treat the symptoms.  List making, schedule planning, and napping tend to help as do watching television and staring into space.  You may think that completing one project at a time is the perfect cure, however, that has never been successfully done by a DIY ADD sufferer.

Why is it that when I have a bigger sized diy project on my plate, I end up getting ADD and start a billion plus one additional projects? My weekend was a crazy blur of to do lists and Home Depot trips and painting mental pictures for my husband.  Not a single project was completed, but about 5,000 were started.

This is what I woke up to today:

We're pretty excited about this new project...
Even Layla started chipping in and helping
Remind me to tell you about my oil -based primer fiasco
Lead warning? Really?
Yeah...we're a mess over here!

Please tell me others suffer from the debilitating DIY ADD virus....

Saturday, April 16, 2011

Inspiration Boards

I recently discovered OlioBoard.  It's a pretty awesome site that allows you to create and play around with inspiration boards. If you haven't played with it, I suggest you do.

I've been frustrated with how slow creating the perfect home happens.  I can see it in my head and I can see what needs to happen, but due to time and monetary limits (not to mention we're living in an apartment now), it's been slow going. So, I decided to create my ideal rooms in OlioBoard so I have something to motivate me and keep me excited.

This first one is of my master bedroom. The color scheme is gray and green with nature dispersed throughout.  Right now we have all black and white photos (aspen tree, birds, wedding photos) with white frames from Ikea, a gray duvet for the winter and green quilt for summer, and silver touches around the room.


We still need to paint our furniture. Right now it's a mish mash of 70's brown, cream, and black.  I'm picturing white or gray or even a fun green.

Our master bath is currently green and white - a smooth transition from the bedroom.  We have white towels with green stripes and matching rug. Our shower curtain is white as well.


I can't wait until we have a prettier bathroom. You should see the cabinets and mirror we have right now...sometime I'll have to take a picture for you.  Oh, and check out that cool stump/stool! Awesome!

For our office I want bright and fun but soothing.


This inspiration board makes me smile.  Right now all we have is the two person desk and some ugly bookshelves in our office. I can't wait to make a fun and spunky office!

I wish I had the sources of each of these items ..though honestly I doubt they're anywhere within our budget.  The inspiration boards are simply that: inspiration. A fun way to get excited about decorating when I feel sad we can't make everything beautiful at once. 

Now, if you'll please excuse me I'm just going to stare at these until my rooms miraculously improve.

Friday, April 15, 2011

Branch Glimpse

Yesterday our little family went on a walk to explore the wooded area behind our apartment. It was a fun little walk and we returned with something interesting.


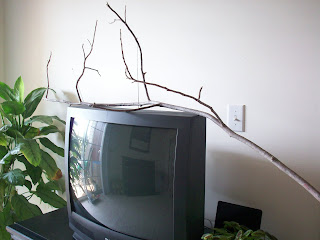
Yes, that is a huge branch laying on top of the television. I can't wait to get started on it so I can show you the end product....I just hope it turns out the way I have envisioned it in my head...


I hope everyone enjoys their weekend! This weekend I'll be working on cleaning our balcony, playing with this beautiful stick, and cleaning the apartment - we had our windows open all week and now every single thing is covered in a thick layer of green-yellow pollen.  Our allergies are killing us.

Appliqued Bird Pillow

appliqued pillow bird

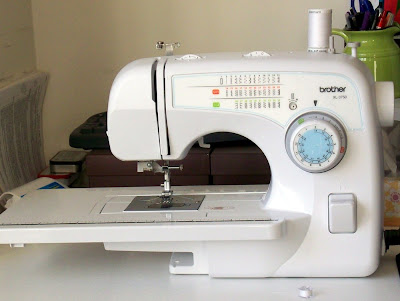
Yes, you are looking at my brand new sewing machine!!! I received a big box in the mail in February and when I opened it, I was surprised with this amazing sewing machine. I've always loved sewing things - if I can't find a cheap, beautiful pillow or blanket, I have no problem just making my own...however without a sewing machine I spent many sad nights sewing by hand. This little machine will soon become my best friend - a pillow that use to take me 5 hours to sew by hand I can now complete in about 30 minutes.

sew pillow with bird

When I opened my surprise, I immediately skipped off to the fabric store with yet another surprise I received - a gift card (it was as if the month of February was raining surprises) and bought some beautiful blue fabric.  I had a throw pillow that was looking a little worn and decided to warm up the machine with a simple pillow cover.

how to make a pillow with bird silhouette

I love the envelope pillow case - so easy to sew and so easy to slip on and off pillows.

diy bird pillow

A couple summers ago I made several fabric flowers to pin onto summery dresses...unfortunately I made them too large and their weight pulled my dresses down dangerously.  They lived a sad life in a box until I decided to group them on the new pillow cover to add some interest and texture to my couch. 

bird silhouette pillow

The pillow stayed like this until last night. The month it sad on my couch it just never seemed to fit in and assimilate with the rest of the pillows.  I've been oogling applique projects lately and decided spur of the moment to re-do the pillow. 

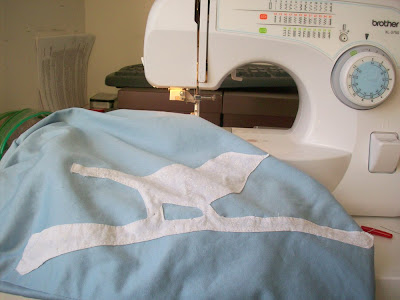
I traced a bird onto a scrap piece of paper and used it to cut the fabric out.

make a bird pillow

I pinned the fabric onto the pillow after ironing small hems around the perimeter.

blue bird pillow

I have learned my lesson and will never again applique onto an already created pillow. Ugh, such a pain!  Let's just say there were several times I had to tear out some sticthes because I caught the back of the pillow case.

bird silhouette pillow

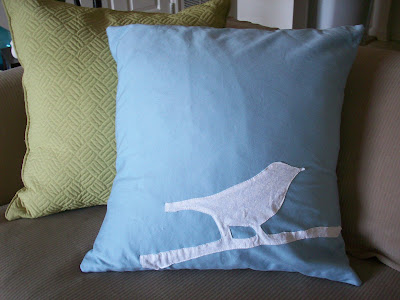
I love how it turned out! The white fabric has a white-on-white flowery pattern that adds some interest to the silhouette.

how to make a appliqued pillow

I may still add another branch with some leaves in the upper left...we'll see after I live with the pillow for a few days.

sew bird on pillow

Already I love this little bird more than those flowers. I guess they are headed back to their sad little box until I find another way to use them.

make bird pillow


Check out the Linky Party tab to see what parties I link to regularly!

LinkWithin

Related Posts Plugin for WordPress, Blogger...