Showing posts with label trees. Show all posts

Monday, December 5, 2011

Other Creative Trees

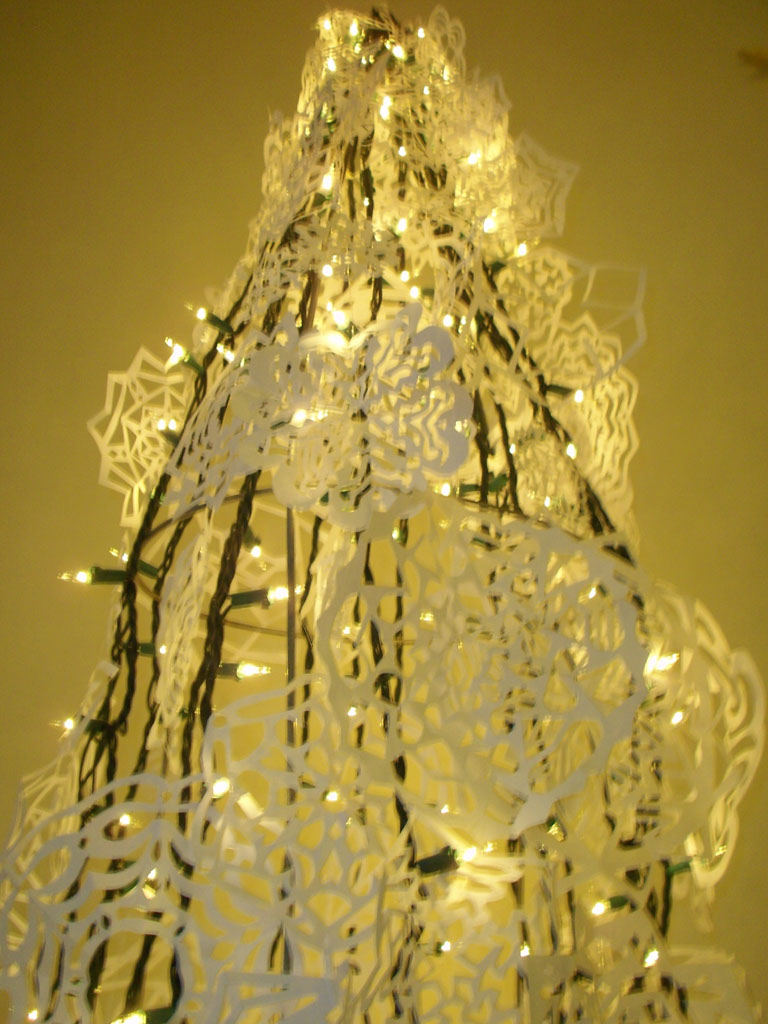
We have been greatly enjoying our Non-Tree Christmas Tree. (You can check out what a Non-Tree Christmas Tree is here and see our very own right here)  It's beautiful and wintery during the day and romantic at night.  I just love how the illumination on the snowflakes reminds me of watching snow fall beneath a street light.

I was curious to see what other creative Christmas Non-Trees have been assembled after finishing ours and enjoying it for a few nights.  Check out these awesome non-trees:

via

via

via

Have you ever had a non-traditional tree? If not, maybe you've known someone who opted for a non-tree? Thinking back, I've only ever known people who went the traditional route - Christmas trees, menorahs, etc.

Thursday, December 1, 2011

Non Tree Christmas Tree

Note: This is the final post in a series of posts. You can read the following here:
Post 1: What is a Christmas Non-Tree?
Post 2: Snowflake Blizzard


We decided not to cut down a tree this year because we'll be heading to New Mexico to spend the holiday with my family for a week. It seemed like a waste to get a fresh tree and only enjoy it for a couple weeks before we head out and leave it all alone to die on Christmas Day. Instead, we decided to use the money we would have put towards the tree towards airline tickets.

Don't get me wrong, though. I love all things Christmas and that includes a Christmas tree. In an effort to save money, I decided to upcycle some things I had at home to create a Christmas Non-Tree. After picturing many different ways of creating a Christmas Non-Tree, I decided to use our tomato cage. It was the perfect shape and would be the easiest method.


After scrubbing it down and sanding some rust off, I got to work draping it with Christmas lights.


The easiest way for me to do that was draping them vertically and weaving them in and out of the metal rungs.


I then gathered my billion snowflakes and threaded them with fishing line. I made about 14 strands of snowflakes. After tying them together, I draped them over the tomato cage, arranged them carefully, and voila. A Christmas Non-Tree!


It looks beautiful lit up and reminds me of watching snowflakes drift around in front of a street light.


Now that we have a Christmas (non) Tree, I can finally start to get in the Christmas spirit. I still have some other minor ways I plan on transforming our home but until then I think I need to light a candle. One drawback to a Christmas Non-Tree is that it doesn't smell like evergreens. I guess you can't win them all!

Have you ever made a creative non-tree instead of going the tradition route? I'd love to hear all about yours!

A Snowflake Blizzard

Note: This is the second post in a series of the unveiling of our first ever Christmas Non-Tree.
To see the first post, go here.

I love snowflakes. Real snowflakes, paper snowflakes, glass snowflakes. They are a great way for me to enjoy the snow and winter wonder while staying warm and dry. It's also a great way to bring the winter wonderland into your home.


When I began formulating my plan for our very first Christmas Non-Tree, I knew I wanted to incorporate snowflakes. If I was going to throw tradition (ours and practically everyone's) to the wind, I wanted to embrace the non-tree idea and make it completely different from any of our previous trees. Enter snowflakes. They were my life for the past week. Every spare moment was spent cutting tiny geometric shapes out of folded paper. At one point my thumb was swollen and purple from the scissors and my finger tips bruised from folding. Still, though, I persevered.


Naive me thought about 75-100 snowflakes would be enough. Nope. I ended up cutting 193 snowflakes (yes, I counted).  I think I may be a snowflake aficionado now.


If you've ever wanted to know how to fold a snowflake, here you go!

1. Start with a square:

2. Fold in half diagonally:

3. Fold in half diagonally again:

4. You will have a smaller triangle:

5. Take one side of the triangle and bring in to the middle:

6. Bring the other side over so that the outer length lines up wiith the opposite outer length: *
*hint: sometimes you have to play around with steps 5 and 6 to get them to meet perfectly.

7. Cut the top and a bit of the point:

8. Cut random shapes out of one or both sides. Play around and experiment!

9. Unfold and check out your unique paper snowflake:

Stay tuned to see how I used these snowflakes to make our very first Christmas Non-Tree!
Part one - What is a Christmas Non-Tree?

Christmas Tree Day

Note: This is the first post in a series that will lead to the unveiling of our first ever Christmas Non-Tree.
For part two, go here.


Can you believe that today is the first day of December? I feel like September was just a few days ago!  Growing up, I always loved the month of December. The sparkling lights around the city, glowing Christmas trees glimpsed through windows, Christmas music playing in the stores. Such a hopeful, optimistic month filled with love and goodwill.

My family has created many many Christmas traditions and I hold each one of them dear. However, once I got married I knew I needed to create new traditions with my new little family. John and I were unable to fly home to New Mexico for our first two Christmas' which was sad and lonely, but I think it was also a way to drive home the point we are each other's family and we created amazing holiday traditions that we look forward to now.


One of the first things we did together for our first Christmas was chop down our own tree and decorate it together. That tradition, however, is going on the back burner this year. We are visiting New Mexico for Christmas and that has forced us to make some sacrifices both financially and with our traditions. We decided to use the money we'd typically spend on a tree towards our airline tickets.


Don't worry, though! That doesn't mean we aren't going to have a Christmas tree! We are simply creating a non-tree Christmas tree!  What is a non-tree Christmas tree, you ask? Well, it's a tree that is constructed from upcycled things you have at home. It's a way to enjoy the lights and ornaments and other decorations without having a tree (real or fake).

For the past week I've been cutting hundreds of snowflakes in preparation for the first ever Holt Christmas Non-Tree.  Our house is covered in little paper flakes and my fingers are bruised and sore. Our computer paper has been diminished and all I can see are tiny triangles and circles and folded paper.

By the end of the day, though, the Holt Christmas Non-Tree will be displayed for all to see. So, stay tuned for periodic updates on the snowflakes, the Christmas lights, the non-tree, and the holiday spirit!

Part two - Snowflake Blizzards

Monday, July 11, 2011

The Parsimonious Penny Pincher

Hello Turning a House into a Home readers, I am Kristen's husband John.  My wife has inspired me to take on some of my own diy projects lately and she has asked me to share some of them with you throughout this week.  I used to consider myself a cheap person.  That is, until I married my wife.  Frugal is an understatement when I describe her spending habits.  A parsimonious penny-pincher I think is a more accurate description (sweet alliteration, I know!).  I have friends with spouses that are big spenders and live outside of their means.  We definitely do NOT have that issue in our household.


One of the many things that my wife's frugal habits have shown me is that the small patch of woods behind our neighborhood is an untapped resource of creativity and a beginning to many diy projects.  It is the same as modeling clay is to a sculptor or blank canvas to a painter.  I will frequently make a "woods run" for more supplies (Yes, our neighbors do think I'm crazy as they stare at me and wonder why this man frequently carries branches back to his 3rd floor apartment).

When Kristen needed a new plant stand on our balcony, did I go to Home Depot?  Of course not!  I made a woods run!


I searched the woods until I found the right branches that I wanted to create a plant stand.  I wanted straight, long sticks that would work for the top and legs for the stand.  I also wanted some smaller pieces for supports.  All the wood I used I found on the ground and did not cut anything from a tree.  At the same time I did not want anything that had been down very long as it may have started to rot.  Once I had some supplies, I was ready to cut!

I began by cutting the branches into smaller pieces for the legs and the top.  Now, normally I like to plan how I'm going to make a project.  I will draw diagrams, look up different ideas, make very careful measurements.  With this project, I totally improvised everything as I went along.  In hindsight, this was not the best idea and I definitely could have benefited from a little more planning.  In fact, I ended up starting from scratch half-way through the first try.


Also, if you ever do this, use a miter block or a chop saw.  Your cuts will be much straighter than mine and
the time it will take will be drastically reduced (especially with the chop saw).  I did however know how large I wanted the top to be.  I wanted the top to be 12"x12".  I cut 2 - 10" sticks that I could secure the top to then I cut 9 - 12" sticks that I glued to it.  The legs were all cut at 14".  


Once I had my top and legs cut, I glued the top together.  I used screws to fasten the legs to the top.  From there I screwed in some supports.  The side supports I drilled holes into the legs that the supports could fit into and slid them in with a small amount of wood glue.  Overall I used four screws, some wood glue, and some gorilla glue to fasten the wood together.  I did not want to use too many screws as I think they take away from the overall natural look.


We now have a rustic plant stand for our growing container garden on the balcony. We have yet to decide if we want to stain it to match the bench we built out of branches as well or if we'd rather leave it natural.  Not only is my wife happy with the end product, the plants are loving it, too.


 - JOHN

Friday, June 24, 2011

Sticks and Stones


Given my obsession with sticks, twigs, and branches it was only a matter of time until I created another piece of art with nature's free crafting supply.  While gluing sticks together for this project I found myself contemplating about my love of dead tree limbs tree branches.  I didn't come up with an answer, but I did come to appreciate their versatility and ability to become anything you want them to (including a focal point and flowers)


My vision began with this pile of sticks on our balcony.  I sanded them lightly to create a worn look and broke them into smaller pieces.


After playing around, I found that I enjoyed the whimsical shape of the heart paired with the rustic quality of the sticks.  Simple but texturally interesting.

Sometimes I wonder if a home can have too many dead trees twigs but I highly doubt it. Nature, in any form, is beautiful.

Wednesday, June 15, 2011

Bringing the Outdoors Indoors

I'm sure by now you know just how much I love nature and how much I love to invite it into my home. Not only have I used one branch as art, I used another branch as a jewelry hanger and yet another fallen tree to make a bench.  Yes, I love nature and trees and flowers.

I was perusing the large and infinite world wide web recently and discovered that there are others that are beginning to bring the outdoors in.  Branches, leaves, and driftwood all provide a neutral, yet majestic touch when used in decorating.

via

I have fallen in love with this twig lantern. It's simplicity and rustic charm are coupled with the elegance of the smooth, bare wood.

via

This lamp would be so simple to recreate with a small cylinder lamp base, some straight sticks, and twine to hold them together.  It would match any color combination and bring a dash of interest to a corner.

via re-nest

This very creative pendant lighting is beautiful and completely unexpected. If you look closely, you'll see the branch being supported in the pot with the pendant lamp cords wrapped tightly around the length of the branch.  I can also picture a branch hanging from the ceiling and supporting lighting above a dining room table.

via diy ideas

I have this picture saved on my computer and every now and then open it just to stare at it. Such a great idea to use a branch as a unique upcycled curtain rod.

via a la mode

Sunburst mirrors have been making a big splash in the blogging community and here is one that I love.  They spent hours on the beach collecting perfectly straight driftwood pieces and their result is beautiful.

I've been inspired to continue bringing the outdoors in in small but unique ways. Perhaps a trip to Goodwill is in order to find a lamp just begging to be wrapped in sticks.

Wednesday, June 8, 2011

Mary, Mary Quite Contrary


Today we are celebrating flowers. Not just any flowers, mind you, but flowers that don't wilt, don't cause allergies, don't cost money, and don't go out of season. Yes, today we are celebrating pom pom flowers.  I love pom pom flowers for a myriad of reasons, among them the fact that you can choose any color under the rainbow that you want and you can dress up little corners of your house and then just forget about them.

I've had many comments about the flowers seen in this post and many more emails asking how the flowers were made. Well, hold on tight because you are about to embark on a journey of discovery and learning, my friends.

The first thing you must do and the second most fun part of this craft is picking out the color you want (don't worry, I'll get to the number one most fun in a bit).  I chose yellow and white for a simple yet summery feel.


Once you've chosen the perfect shade of color, you have to decide how large you'd like your flowers. I tend to make mine a variety of sizes by altering what I'm wrapping the yarn around. I've been known to use a fork for smaller flower all the way to to my entire hand for a larger flower. Typically I alternate between two, three, and four fingers.

After deciding on the size of your flower, just start wrapping. If you are choosing to wrap around your fingers, you may want to keep them apart a little so that your circulation doesn't get cut off from wrapping the yarn too tightly.  Have fun wrapping and keep in mind that the larger the flower you want, the more wrapping you must do. I tend to like full flowers so I wrap a lot - 100-115 wraps for a small flower, 110-125 wraps for a medium flower, and 130-150 wraps for a larger flower.

When you've finishing wrapping the yarn around and around and around some more, carefully take the yarn off your fingers (or fork or whatever else you found to use) making sure to keep a finger in the hole of yarn.

You will then take the bit of string you cut previously (oh, you didn't? Don't worry, I always forget, too) and carefully push it through the hole and tie it as tightly as possible in a double knot.


Then take a pair of scissors, place one blade in the hole and cut opposite of the knotted piece of yarn.  Don't worry if it looks like a floppy mop, you are now at the funnest part of the craft: trimming the yarn.


The trick to getting a perfect pom pom flower that isn't floppy and yarn-y is to trim, trim, trim. Never have I trimmed too much, but many times I haven't trimmed enough.


Even this guy needs more trimming! Just keep trimming, just keep trimming.


When you've finally got the little ball of fur perfect, with a dab of hot glue in the middle of the yarn ball firmly place the small twig into the flower.  I like to try and get the twig inside the center of the flower careful not to come out the other side.


There you have it - a beautiful pom pom flower.


LinkWithin

Related Posts Plugin for WordPress, Blogger...