Thursday, March 31, 2011

You're on my Mind

 You know that feeling when you have a special someone on your mind and all you want to do is be with them and fix things for them? But the hardest thing is, even if you could be with them, you can't fix the thing for them? And the moment you realize that, your heart breaks yet again for them?

Yeah, I know that feeling too.  Unfortunately.

This is a collection of beautiful things I think may put a smile on her face for a minute or the very least show her something beautiful for a brief moment. 

Happiness is...

Happiness is lemon-scented and cheerful yellow, definitely. I'm sending lemon-scented and yellow thoughts your way.  Also, I think this project must definitely be tried.

Apartment Therapy

A couple years ago, my friend and I attempted to grow some moss in beautiful glass vases.  She painstakingly dug up a variety of moss and we planted it together. Mine lasted about 6 days, hers a little longer. It was a major disappointment but I think it may be time to have another go at the moss...

Katy Elliot
Design Squish
Twig and Thistle

I love all things ceramic.  Here's a little sampling of things that make me smile....thought they'd light up your face, too.  Pssst...I have an idea for these - unfortunately we'll have to wait until fall.

Kim Vallee

Terraniums are simply magical.

Flicker

I think this picture speaks a thousand words.

The Long Thread

As does this. 

In the Meantime...

I am currently up to my elbows with many little projects that are all half done. Does anyone else ever make that mistake? A couple weeks ago, I was on a roll and starting things left and right...then my steam just ran out and my office is now a disaster area of half completed projects and ideas.

So, while I try and refocus and motivate myself, I thought I'd leave you with some recent motivational and inspirational photos I've come across recently.

Shoreline Interiors
You know by now I hate Ursala, our big, black TV console. After painting our ugly orange-tinted end tables, I've known that the key to creating a cohesive living room is to paint the sea monster a light, soothing color like the dresser above.  I'm currently looking at paint colors and trying to talk John into helping me sand the massive beast.

letterperfectdesigns
I need a monogram in my home, but the typical ones seem too flat to me - hence why I never jumped on the monogram bandwagon.  I recently found this etsy shop where the monograms are made out of hundreds of buttons and I'm in love. There is depth, sparkle, interest...and I'm going to make something with that idea!

reference unknown
I've been drooling over embroidery projects lately and have been wanting to take a stab at it for a few months. I found on etsy (I lost the store info) and fell in love with him.  I think he'd look great in a child's bedroom with several other animal silhouettes or in the midst of a gallery wall.

flicker
I'm inspired by this picture of a jar with a miniature paper crane mobile inside.  I know just who I would give this to, too...looks like I'll have to remember my crane folding skills again!

Wednesday, March 30, 2011

A Bright Optical Illusion

Today is a dark and dreary day full of pouring rain and our apartment is as dark as it typically is at 8pm. Combine those two facts and it's looking like a depressing day...which got me thinking, "When your home is dark and dreary with misplaced windows, how do you increase the brightness factor?" Since we live in an apartment, installing windows, skylights, or other obvious fixes are out of the question. Luckily, there are many optical illusions you can use to increase the lightness of your house.

BEFORE: Spotted on AmazingHomeMakeovers
AFTER: Spotted on AmazingHomeMakeovers


Paint is the most impactful way you can lighten up a room.  Dark or flat paint absorbs the light and does nothing to reflect and bounce it around - instead it makes it feel like a dark cave.  White is the obvious choice when choosing what paint to increase brightness, but other pale shades can work just as well.  Pale beiges, buttery yellows, or creams in gloss will do wonders to your room.  Don't forget your ceilings and trim - paint them a crisp, bright white!


The easiest solution to the darkness problem is a mirror; strategically placed, a mirror will reflect whatever light is already received into the home by multiplying it and bouncing it around.  A large mirror hung opposite a window will distribute light nicely and also make your room appear more spacious.  If lacking a large mirror, several smaller mirrors grouped together will also do the trick - you could even hang four square mirrors to create the illusion of a window.


pic name
AFTER:   Spotted on HookedonHouses

pic name
BEFORE:   Spotted on HookedonHouses


In addition to lightening up the walls, furniture should also be considered. Dark browns and other colors will suck the light right out of your room (and my mood).  Think about light-colored slipcovers, white linens in a bedroom, white or light-colored drapes on the windows, and a light-colored rug to cover up darker wood or carpeted floors.  Lamps covered with white shades will also help.

Spotted on TThe Design File

When thinking of your windows, hang your curtains above where the window starts and extended over part of the wall on either side of the window.  In doing so, the curtains will reveal the entire window (or most of it) without blocking any essential light coming in...it also creates the illusion that the window is larger than it actually is.

Spotted on HookedonHouses

spotted at YoungHouseLove


Having additional light and white objects around the room will also help lighten it up - think light-colored throw pillows, white vases, light-colored flower pots, and white picture frames (with colorful and bright pictures).  Light reflects, bounces, and will work it's way into dark corners if allowed (just picture how the moon reflects off snow to create a bright, snowy night). 

Now, if you'll excuse me, I must turn on a lamp and ponder what light color to paint my big, black, light sucking TV console.

Tuesday, March 29, 2011

The Apple Doesn't Fall Far from the Tree

My mother taught me everything I know about being crafty and creative.  Growing up she always had fun activities for us to do such as ironing crayon shavings between wax paper, cutting out snowflakes, and sculpting with play dough. In fact, she is the most artistically crafty person I know - somehow her snowflakes turn out better than I could imagine, her dyed Easter eggs are more vibrant that the sun, and her drawings are more beautiful than real life.


As a child, I wore mostly homemade clothes; they were beautiful and I wish I still had them. She decorated our house beautifully with homemade wreaths, hand quilted quilts, and sweet knick knacks.  I am slowly following in my mother's footsteps but am still in awe of her skills: sewing, knitting, crocheting, drawing....


Enough boasting about how great my mother is.  I simply wanted to share her latest creation she whipped up this weekend. 

For those wondering the details of making a yarn wreath, here is what my mother shared:
          "It used about half of a skein of cheapy Lion Brand Homespun. 
          I just used one of those plastic wrapped straw wreaths (the plastic
          was helpful to keep it from snagging during the wrapping.)  And 
          I used the squares of felt from the craft section that come in lots 
          of colors. You can get one big flower and one or two little flowers 
          from each square."

Monday, March 28, 2011

Cooking like a Pioneer: Fireplace Chicken


 Today I will be sharing our favorite adventurous, fun, and crazy recipe. If you've never made an adventurous, fun, and crazy meal before you are definitely missing out. Perhaps you should try this one tonight.

Two Christmas seasons ago, I casually mentioned how fun it would be to cook something in our fireplace. You see, John and I love camping and cooking over a campfire, but in the dead of winter, I was not about to venture off my warm couch to have some adventure and fun.  That simple comment of mine sparked an intense flame of desire in John and he made it his mission to cook a chicken in our fireplace. He researched, he shared his plans with everyone he met, he planned the big day to be Christmas.  Don't worry, I hid a frozen pizza in the freezer just in case. When the big day arrived, we didn't need that pizza because that chicken was the most delicious, amazing chicken we have ever had. It was super moist, amazingly fragrant, and oh so scrumptious.  After that Christmas dinner, I seriously dreamed of that chicken for months, but John had deemed the amazing Fireplace Chicken so awesome, it would only be cooked on Christmas Days. Sigh.  Lucky for you, though, because you can eat your Fireplace Chicken (and yes, it must be capitalized out of honor and respect) whenever you want. So, maybe you could cook some tonight and mail me a leg or a breast or even just a wing.


John preps the chicken by seasoning it well above and under the skin with olive oil, rosemary, thyme, salt, and pepper (he says under the skin is the most important step).  He also slices some fruit like apples and oranges and perhaps an onion and places them in the cavity of the bird. When he gets fancy, he juices the oranges and pours it under the skin.  Then he takes small pats of butter and places them under the skin near each breast, the legs, and wherever else you'd like. This keeps the bird moist and gets the herbs moving around.  He likes to skimp on the butter, but I say the more butter, the happier the chicken and I both are.

chicken fireplace

Look at that fabulous looking bird!  We usually let him sit and marinate for an hour or so while we work to get the fire ready.  The fire must be HOT before you introduce it to the chicken.  In order to develop a deep core of glowing embers at the base of your fire, ensure it's burned at least an hour with several big logs. These embers supply all the heat and without them your chicken will complain he's cold and naked.  As your wood burns and the pieces fall into the bottom and burn as embers, consistently add fresh wood on top to keep a big blaze going. It should be uncomfortably hot about a foot in front of the fire.

chicken fireplace recipe

The next step is to string that bird up. Take some kitchen twine or string, soak it water for several minutes, and then tie him up.  Sew the cavity shut and wrap it around the bird to create a harness.

fireplace chicken recipe

To tie up the bird, start by piercing the back, just to the side of the backbone near the tail and pull through a long length of twine. Twist the string around the heal of the drumstick tightly several times and then bring it up to the wing and secure with several twists as well. Bring the string around the front (between the front of the breasts and the base of the neck) and to the other wing. After wrapping the wing several times, proceed to the last drumstick and wrap this several times as well. Pierce the back again, just opposite the initial spot,   so that the twine comes out the back near the tail next to the twine coming in. Pull both ends tightly so that the drumsticks are pulled up to the body tightly and tie several times to secure. Cut the shorter end close to the knot and leave a long length to hang the chicken from while cooking.

recipe chicken fireplace

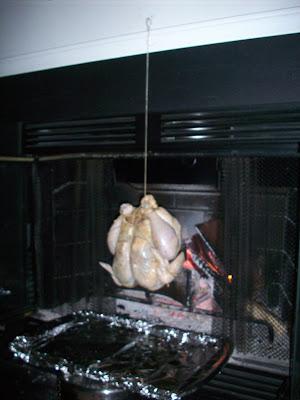
John put a small hook above our fireplace that holds the stringed-chicken. Notice that we have a pan a few inches under the chicken to catch drippings.  For the next 2-3 hours (depending on the size of your bird) your job is to sip wine, play board games in front of the fire, and ensure the chicken is rotating.  We also wet our sting with water periodically to ensure it doesn't dry out and snap (last Christmas it did and oh the frenzy in our house as we reacted to the crash...). 

chicken campfire recipe

While relaxing and enjoying the fire and family time, you can occasionally baste the chicken with a mixture of olive oil, salt, pepper, and herbs.


Our games of choice during this sacred time are Bananagrams and Rummikub.  You'll also notice the wine glass which is a definite must.  Cooking Fireplace Chicken without some chef juice is just wrong.

chicken recipe fireplace

It's a lovely sight, isn't it?  You may need to raise or lower the chicken by wrapping the string more or less on the hook if the bird is getting cooked in just one area.

recipe fireplace meals

Here's an action shot of the basting.

cooking with fireplace

The chicken is done when the core temperature reaches 165 degrees. When checking, be sure you don't touch the bone with the thermometer. You can also put it in the oven on a low temperature for 15 minutes to ease your mind if you'd like. Can we get back to that picture - look how golden and beautiful it is! Cover with aluminum foil and let rest for 15 minutes.

fireplace chicken recipe

During this meal we served him with some sweet potato fries and beer.  Enjoy!


Recipe: Fireplace Chicken

Ingredients

  • 1 small chicken (we got a large chicken one year and not only did it take 4 hours to cook, but it also broke the string) 2-4 lbs
  •  2-3 tablespoons olive oil
  • 2-4 tablespoons of butter
  • 3 tablespoons rosemary
  • 3 tablespoons thyme
  • Freshly ground pepper and salt, to taste 
  • Apple, sliced
  • Orange, sliced
  • Onion, sliced
  • Cooking twine, soaked in water

Preparation Instructions

Rub chicken on outside and between skin and meat with olive oil, rosemary, thyme, salt, and pepper.  Place pats of butter under skin near breasts and legs.  Stuff cavity with fruits and vegetables.  Let marinate for an hour while stoking the fire.  String bird with twine to create harness and tie to hook above fireplace.  Cook for 1.5-3 hours, depending on size of chicken. Ensure that chicken is slowly turning throughout cooking process.  Every 20 minutes or so wet string with water and baste chicken with olive oil and herb mixture.  Chicken is done when core temperature reads 165 degrees. Let sit for 15 minutes to allow juices to soak in. Carve and serve.


Linking up to:
Keeping it Simple
The DIY Show Off
Craft-O-Maniac 
Tip Junkie

Friday, March 25, 2011

Decorating with Yellow

I've noticed that I've been in a color-rut lately. I'm drawn to the same colors time and time again (grays, blues, greens) and, while I enjoy seeing splashes of different colors in others' decorating, I never consider it for my life.  Today I'm looking at how others use splashes of yellow to liven up their homes.


Country Living

I love how this piece of furniture pops with the white walls and accessories...but it's not too showy and flashy.

Martha Stewart

The pops of yellow in this living room don't overpower the room, but do add enough sunshine to make you smile.  I could see myself decorating with a yellow mirror and throw pillow.

Gap Interiors

I also need to remember that not all yellows have to be in-your-face-yellows. The throw pillows and lamp are a nice buttery yellow and bring warmth.

Pillow Throw Decor

This is a nice baby step for me. It includes the blue and green hues of my living room while also introducing some yellow. I'm in love with it.

>Design 360

A little bolder than I'd typically go for, but hey, if you're going yellow, may as well go all out.

Delilah Devine

I'm so in love with these cute geese.  I'd take them in any color, really...MUST STAY AWAY from gray, green, and blue, though!

Are any of you in a color rut? What are some tricks you've done to introduce some new spice and hues to your home? I think I'm going to buy some yellow paint and challenge myself to make some art or paint a frame.  Wish me luck!

Thursday, March 24, 2011

If At First You Don't Succeed, Try Try Again


I didn't succeed in my first try...or my second...or my fourth. Luckily I kept trying and am able to say that I painted some bottles. I know what you're thinking and you can go ahead and say it, "Painted bottles, that's the easiest thing in the world." I know and I'm still not sure why this craft and I don't get along. Maybe if I show you my journey you can tell me where I went wrong, because I'm still not sure.

The journey began two months ago when I was not quite satisfied with my spray painted wine bottles and realized that I missed the shiny, glossy look of the glass. I decided to try pouring some paint into an old spice jar and allowing the outside to remain clean and glossy. I didn't have any enamel paint, but I did have leftover latex paint and used that.  I left it upside down for several hours checking it periodically to wipe away the excess paint.  All was looking wonderful so I decided to do some more spice jars. When I went to bed that night, they were looking beautiful.  The next morning I discovered what would come back to haunt me time and time again:

This was actually the third try, but you can see the horror.

Overnight, as they dried, the paint ran completely down the glass and left areas paint-free. I thought perhaps it was the type of paint I chose so I tried craft paint next. All looked well, until 12 hours later when I'd see the streaks.

Looking beautiful before bed

I tried pouring more paint in and recovering the naked areas, but that left the bottles with visible streaks in the sunlight:

Streaks after trying to fix

I also struggled with the paint bubbling at the bottom of the jar after I started alternating upside down and right side up every hour in an attempt to keep naked areas from appearing. I tried keeping the lid on, keeping it off...

pic name

pic name


A few times I ended up peeling the paint completely off and starting again. I began to think maybe I should just give up, but then I saw others with their own jars painted around the blogging community and it just fueled my crazed mind. Why could others do it and I couldn't?

In the end, I spent days painting and repainting with a teeny paint brush to cover over the naked areas that appeared each night that I slept. After four days the paint finally dried and stopped running around the jar.  Let's just say, until someone can tell me their secret, I am done with these beautiful, shiny, amazing glass jars.

Only three out of 9 turned out

So, what's the secret?!? I desperately want more faux white milk glass!


Linking to:
A Crafty Soiree
Paisley Passions
A Glimpse Inside

Wednesday, March 23, 2011

Everybody's Gone Surfin'....Surfin' USA

There is something about warm temperatures, sunny skies, and the beach that just makes me want to bust out with some Beach Boys songs.  Don't pretend you don't....here, let's take a brief blog break and everybody join in with me...
 If everybody had an ocean 
Across the USA
Then everybody'd be surfin'
Like Californ-I-A
You'd seem 'em wearing their baggies
Huarachi sandals too
A bushy bushy blonde hairdo
Surfin' U.S.A.
Beautiful!  I just love the summer, in case you haven't noticed. In order to take advantage of the amazing weather North Carolina has been showing us this spring, we decided to take a day trip to Topsail Island and explore the coastal area.  While John's main goal was to relax and have fun, mine was to find some great seashells to incorporate into our gallery wall.  I think it's suffice to say we both accomplished our goals...and I even got John in on beach-scouring.

Seashell side note: I've learned many times after many vacations that it's important to rinse out your shells as soon as possible. Believe me - if you leave them in a bag or tupperware you will be sorry when you open them up. Stinky!  When I get home or back to a hotel, I just plug the sink and fill it with hot, soapy water and let the shells soak overnight. The next day I air dry them on a towel and voila!

We found some great pieces of sea glass, sharks teeth, and beautiful shells. I wanted to add some bigger frames to our gallery wall as well as introduce more texture so I decided to display some finds in an old frame I spray painted.

seashell art

shell art frame

When I've collected shells in the past, they typically stay in a baggie under the bed and I reminisce when I find them while looking for lost shoes.  I love that I am displaying a variety of my beach finds for all to see this way. 

In fact, I liked it so much, I made a smaller frame for my seashell-themed guest bathroom.

seashell frame art shell

The new framed artwork looks a lot more elegant than this shell frame I made while in college to display my various road trips to various beaches.


In college I was definitely a fan of the multiple-frames-in-one as well as the color brown. My tastes have changed and I've had to donate more of these types of frames than I'd care to admit.  This one has stayed, though, because of the shells.  Despite looking fragile, this frame has proved pretty hardy in my many moves to new dorm rooms, apartments, and cities.

sea glass mobile suncatcher

I told you I've been busy this week! Not only did I make two pieces of seashell art, I also made a sea glass mobile. I am in love with this - it just sparkles and glows in the sun.

sea glass mobile suncatcher


I'm planning on writing a quick tutorial later this week on how I made this mobile. The project ended up taking me about 10 hours to make due to some trial and error.  Luckily it turned out well enough to make up for the ordeal it put me through.

While searching for sea glass, I kept coming upon perfectly smooth, polished stones on the beach. While wet they glittered like glass in the sand and after picking up several only to toss them back down, I decided to collect them as well.

rocks art frame nature

I chose to use them to make a small romantic frame for our bedroom. I found some shimmery gray card stock in our closet and spray painted a goodwill frame.  It matches our bedroom perfectly.  Oh, and yes, that is the paper mache bird from this post. I decided not to paint him and instead leave him natural.  After painting several blue, green, and white, I thought this little guy was perfect just the way he was.


I'm linking up:
Today's Creative Blog
Someday Crafts
Blue Cricket Design
A Crafty Soiree  
A Glimpse Inside
Paisley Passions
Remodelholic
Chic on a Shoestring

LinkWithin

Related Posts Plugin for WordPress, Blogger...