Sunday, February 27, 2011

The Intimidation of a Gallery Wall

Everywhere I look there are fabulous gallery walls. Magazines, online, television...and the galleries of pictures always make my jaw drop. The impact of a wall filled to the brim with pictures is spectacular.

spotted at The Kid Collective
Watching television and movies I always see perfectly put together walls of photos up a stairwell or across a living room wall. They look sophisticated, elegant, and professionally done. I wanted one. In a bad way. In graduate school I went so far as buying a set of "gallery frames" that came with 12 matching frames in which I hung photos of flowers I had taken. The impact was, shall we say, significantly lacking. It was dull, boring, and not what other gallery walls looked like. When I moved, I hid all the frames under beds and couches and refused to hang them.

Spotted at The Designers Attic

All those pictures and frames hiding in every crevice our teeny apartment had drove my husband crazy. He was forever begging me to hang the billion frames I owned or throw them away.  My desire for the perfectly planned and hung wall of photos paralyzed me and the frames stayed tucked away until we moved to North Carolina. After packing boxes of pictures and frames - and then unpacking them - I was ready to try again.
 
spotted at Coastal Living
I spent time looking at images of the "perfect" gallery wall and trying to determine what had gone so horribly wrong in my first attempt. What I discovered was that the walls I loved were ones with mismatched frames - color, size, shape. I was drawn to the walls that had texture and interest, that showed character and randomness.  I gathered the billion frames I owned into our office and decided then and there I would proudly display each and every photo and frame I owned, no matter how much it didn't match.

In the end, it wasn't too difficult to plan where to hang each picture. I gave myself the easy job of laying each picture on the ground and rearranging until I found an arrangement that worked. I started with the biggest frame and decided to work around that. Once everything was laid out, I cut out templates that fit each piece to be hung and wrote a description of the photo it represented. I then taped them to the wall to ensure I liked how the arrangement looked on the wall as much as I did on the floor.

That's when I called John in to do the hard work. It was his job to hang each picture to my very exact specifications. Just kidding - the great thing that I realized in making this random, eclectic gallery was that imperfections would just make it more eclectic.  John began by hanging the central piece and worked outward and upward.


We've slowly been adding to it and the randomness of the arrangement allows for us to simply place a frame wherever we desire. I currently have a picture that is in need of a slightly larger frame than the majority of those hung and plan to hang it on the small side wall in place of some of the smaller frames. I'll relocate the smaller frames by moving them to the center of the wall and above the rest.


We also have a smaller, more uniform gallery in our bedroom that is a bit more precise.


This one took more measurements and discussion on how far apart the pictures should be from one another. Once that was decided, John measured where the frame hung, marked it on the paper template that was taped to the wall, and nailed directly through the paper to ensure we hung the pictures perfectly. With the small scale, the exactness of this project wasn't too intimidating....plus we had practice.

So, if you're like me and am overwhelmed and intimated by the awesomeness that is the gallery wall, I say go for it. Remember, it doesn't need to be perfect and you can always add or subtract should you want to change your arrangement. A few holes in the wall are nothing compared to the satisfaction of staring at a vast display of pictures.


Thursday, February 24, 2011

Monday, February 21, 2011

DIY Desk

When John and I got married, we brought together two people's worth of stuff. Two CD collections, two sets of towels, two dressers, two desks. Sometimes two is better than one, but sometimes two is just too much.  Take, for instance, our office. Yes, it was nice to have two desks with which to house our two computers, two filing cabinets, and two sets of desk accessories, not to mention two people who wanted to be at the desk at the same time. However, two desks also meant less room, double the messiness when desks were unorganized, and mega mismatched furniture.

John's desk was messy, bulky, 80's style, messy, bulky, messy...I didn't like his desk very much.


My desk was more elegant with curvy legs and cream paint - much like this desk without the top drawers or mirror. Unfortunately, it was teeny with no storage.


So, when we moved to North Carolina, we knew we wanted to streamline our office furniture and create an office with room to hang out, play music, and enjoy.  Our number one criteria in a desk was that it be large enough hat we could both sit at it on our computers at the same time.  With John going to graduate school, we knew he'd need a desk conducive to spreading out and doing homework, but I also wanted a space that was my own and separate from his messiness (see above picture of his desk to understand why).  Our second criteria was that it not cost us an arm and a leg.

Quickly after beginning our search for the perfect desk, we realized that our two criteria left us with basically no options. The desks we could afford were too small, the desks that were large enough were too expensive. We spent a lot of time looking at Ikea, but even the Besta Burs desk was more than we were willing to spend at $249.


Around the same time we were dealing with our desk dilemma, the writers at YoungHouseLove.com were also struggling with the same situation.  It seemed our criteria were identical, as was our budget. So, we stole their idea of converting a door into a desk.  Looking back at how they ended up constructing their desk, their dimensions were different and we went about constructing the desk in different ways, but the ideas were the same and the outcome pretty identical.

spotted at Young House Love

We bought a $17 plain interior door from Home Depot as well as $15 worth of pine studs to serve as legs and reinforcement. I wish we had taken pictures of our progress but alas, we did not. I will say that John did a great job ensuring our desk would be strong and stable. 

After a coat of primer and paint, this is what our desk looked like


John inserted two wooden braces under the table to reinforce the desk and make sure it could hold the weight of whatever we wanted to place on our desk.


 The rails, in addition to being pretty, serve as extra reinforcement. Believe me, this desk is ready for a weight lifting competition. 

In college I had a shelf I used for my monitor. We spray painted it white to match the desk so that we would have a place to put our printer and other things. With the lack of drawers, we've had to think about how to organize the desk and make use of every bit of space.


Our desk turned out as sturdy as John hoped and as pretty as I hoped. Not only do we have much more room in our office, the room looks more put together without the mumble and jumble of mismatched furniture. We're most proud of the price tag of this desk. Total, including wood and paint, we spent $35.


Next on my to do list is to wrangle those cords together...they drive me crazy!

Thursday, February 17, 2011

Hardbacks, paperbacks, cookbooks, children's books...

spotted on I Suwannee
I love love love books! What could I possibly love more than books? Bookshelves! Seriously, I start to drool at the sight of a room whose only decoration is bookshelves beautifully organized with books. That right there, my friends, is my perfect room. Perhaps you will remember the library in Beauty and the Beast that Belle loved. If only it was mine.
spotted on I Suwannee
Well, I can clean up a drool puddle each and every day thanks to I Suwannee.  They post a beautiful bookshelf each day and I'm in love with them all! These pictures inspire me to continue to harp my husband regarding our bookshelves, or lack there of. I have dreams of a library in my house but for now, I must make due with our current bookshelves.


As you can see, our bookcase in the office is as loaded as it can be.  It actually took some creative organizing to get all those books up there. The books laying down are the shortest books we own.  We found we could stack more horizontally than we could fit vertically.  Believe me, getting all of our books on this bookshelf was a science.

I would love to get more bookcases so that our books aren't mashed together and so that we could organize John's loose music that as taken over.  Let's just say I don't drool when I look at our bookshelves.

This bookcase in our living room houses our cookbooks and hardbacks that were just too thick to fit on the main bookcase.  Luckily this one isn't as crowded...yet.


Someday I will have a room like this.

spotted on flickr

Wednesday, February 16, 2011

DIY Chalkboard

Whenever John needs something at Home Depot, I jump in the car knowing I'll be spending the next 20 minutes ogling the paint department.  One day while aimlessly daydreaming through the paint aisles  I discovered chalkboard paint.  The daydream playing in my head screeched to a halt and I promptly wondered how I had lived for so long without this amazing product.


Enter Michaels, the land of crafts. I knew I had to use chalkboard paint for something so I made my way to Michaels in search of...well...something. The something I walked away with was a wooden plaque.


Having just gotten married and moved in together, I decided I could create something that John and I used to write notes and hold our keys (I was forever finding John's keys everywhere).

 In order to make it, I bought the spray paint version of Rust-oleum Chalkboard (mainly because it was cheaper and I didn't need too much) and some primer. After spraying 3 coats of chalkboard paint and waiting 24 hours I had John screw in some brass hooks.


It now hangs near our front door to hold keys, dog leashes, and purses. The main purpose it serves, however, is to allow us to write haiku notes to one another.  I only wish I could remember some of the funniest.


Recently it seems chalkboard paint has taken over the painting community. While glancing through photos and brainstorming ways to utilize my leftover paint, I find myself drawn to so many options.

http://www.diyhappy.com/blackboard-idea-globe

How fun would it be to paint a bunch of pots such as this....but in these fun chalkboard colors?!

http://www.askjoeygarr.com/?p=2208


Really, the sky's the limit! What would you do with chalkboard paint? 

Tuesday, February 15, 2011

I Don't Recycle - I Decorate....With Wine Bottles

Wine bottles. Spice jars. Olive oil bottles. Salsa jars. The most common food is often stored in the prettiest little bottles. When a bottle is empty, I gaze at it, clean it, and then use it to decorate my house.

Don't you?


Wait, are you telling me not everyone has empty wine bottles around their home?


Oh.

At one point, my collection of wine bottles was getting a little out of hand. You may wonder why I didn't recycle them or even just toss them in the trash. That, my blogging friend, is a very good question. You see, I think I may have a problem. It stems from my inability to fathom spending inordinate amounts of money on pretty vases and other decorating items when I could use what I already have. A problem arises, then, when I pour the last drop of wine...or olive oil. When I shake the last flakes of dried spices or scoop out the last of the pesto I think to myself, "Wow, that's a pretty bottle. If my husband were to ever give me flowers, I could put one in this little spice jar and put it on my bedside table." That is how my out of control collection began.

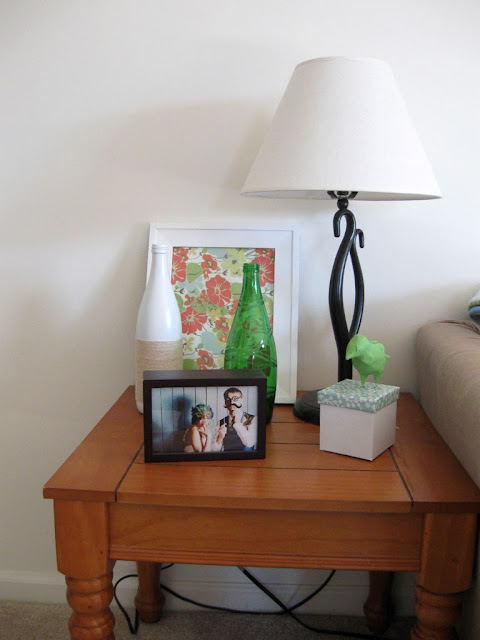
I have been trying to part with my pretty little bottles, but it's hard! So, instead, I'm attempting to re-purpose them, make them appear a little more sophisticated, a little more in tune with my decorating style. For example, in the above picture of my living room I have three wine bottles on the end tables. I like to think they work better spray painted, etched, and hot glued.

recycle wine bottles decorating

Here are some examples of my re-purposed bottles:


I'm also in the process of altering some spice jar by making faux milk glass vases...more on those later.

Is there anyone else out there who hoards glass jars and bottles or am I the only one?

Wednesday, February 9, 2011

You Like Me! You Really Like Me!

Ok, that may be a bit of a stretch! I decided to mosey over to my statistics page and see how often my mother was checking this brand new blog (hi mom!) and lo and behold, she's not the only one who has read the few puny entries! There are 12 of you out there somewhere that stumbled their way over here  - and one of you is in Alaska!


With an audience, I definitely need to step up my blog entries - don't worry, pictures will begin to be added shortly and actual projects will be shared soon. First on the list, bottles, and not just any bottles. You see, the hubs and I love wine. It's only natural we have the reminisces of evenings by the fireplace drinking wine as well. Stay tuned...

Tuesday, February 8, 2011

Revamp!

I stumbled upon this quote today while google searching painted furniture images. It completely matches the last post I wrote regarding my DIY and crafting philosophy. Love it! 

"Reuse. Repair, repaint, reinterpret, revive, redeploy, or simply relish the things you have. The idea that we can dispose of things easily weakens our links with the stuff we own...Revamp, reupholster, and rearrange. If you do offload, find a way to recycle or redistribute. Someone will love what you have grown tired of."
- Ilse Crawford, Home is Where the Heart Is

Just this afternoon I began experimenting with some old spice jars I have been collecting. Tomorrow I'll post pictures of the end product!

Monday, February 7, 2011

Work With What You Have

I never thought of myself as an artsy or crafty person. I don't own a ton of paper, stickers, glues, or paint brushes. I don't own every color of glitters, paints, markers, or yarn.  Sure, I liked to tinker, decorate, and make things...but I always thought it was because I was thrifty and cheap. You see, when it comes to making something, my philosophy is "make something beautiful for cheaper than you can buy it."

While I don't have a closet full of stencils, die cut machines, or beads, I do have spice jars, olive oil bottles, old greeting cards, and wrapping paper.  I have wine bottles, corks, acorns, and pine cones. Being a newlywed, I don't have the means to binge on beautiful items at Pottery Barn, but I do allow some drool to drip as I think to myself, "I could make that!"My inventory of bottles and jars, natural elements and candles allows me to recreate scenes and tablescapes right out of a magazine...for free!  As I explore my decorating style and crafting skills, I'm realizing that just because I can't buy Anthropologie's beautiful owl cookie jar or Pottery Barns sparkly vases, I don't have to stare at blank walls, tables, and counters. I just need to be creative, willing to get dirty, make some (or a lot of) mistakes, and think outside the box.

Past apartments I've lived in with roommates never felt completely like home. With our mismatched furniture, my uneasiness about decorating the living room the way I wanted to in case the roommate didn't like it, and unwillingness to invest much time, the apartments were always sparse, plain, and white. Now that I look back, some of the apartments were full of character, 100 years old, and awesome. How I wish I could go back and decorate the open kitchen shelves, emphasize the huge living room windows...

Now, as a real, live grown up with a place to make into a home, I am embracing the possibilities and the commitment necessary to fall in love with my home.

Wednesday, February 2, 2011

The Art of Blog...and Life

As I stared at the blank, white computer screen waiting for inspiration to flow in blog form, I recognized an uncanny resemblance that this new little blog has with my home and my life. As I chronicle my journey through decorating, crafting, and generally understanding what makes a house a home, this blog will also transform from a blank canvas to a living, breathing entity. I smiled at the profound thought, and then wondered if I was thinking a tad bit too hard about what to write on this very first post that will welcome you.  Probably.

Welcome to my teeny piece of property in the big world of the world wide web. Stay tuned as I work to develop my crafting, decorating, writing, and homemaking skills!

LinkWithin

Related Posts Plugin for WordPress, Blogger...