One thing that you will soon learn about me is my obsession with birds. Don't get me wrong, my house is not filled to the brim with bird-themed paraphernalia...yet. In an attempt to increase said bird-themed paraphernalia, I decided to create my own bird figurines. I had seen some at Michael's last week and began brainstorming how to sculpt a bird. Soon I was remembering third grade paper mache projects and realized how much more paper mache can do besides sculpt the solar system.
While I was googling a recipe for paper mache, I stumbled across a recipe for salt dough as well. My head spun out of control at the choice I had to make - flour and newspaper or flour and salt? Like with any major decision, I said, "Screw it - let's try both!"
Salt Dough Recipe:
(adapted from Arts and Crafts Ideas)
- 1 cup of salt
- 2 cups of flour
- 3/4 cup of lukewarm water
Mix the salt and flour together. Then add the water and mix until a ball has formed. Knead for 5-10 minutes or until dough is smooth and non-flaky. The quality of dough you finish with will depend on the time spent on kneading.
Paper Mache Recipe:
(adapted from about.com)
- 1 cup flour
- 2 cups water
- teaspoon of salt
I began my zippity doo da day of bird making (for those who don't get the reference, it goes along with my title) with the salt dough. After mixing up a batch of dough - I cut mine in half since this was an experiment - I got to work sculpting. Word of caution: I am not a sculptor, artist, or person-who-claims-they-aren't-good-but-really-are (you know who I'm talking about). That being said, I had a failed attempt and a successful attempt with the salt dough. Let me illustrate:
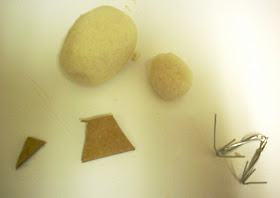
As warned in the recipe, you really must knead this well in order to achieve a smooth, flexible consistency. I found I needed to add a few drops of water to lubricate things. After the dough was where I wanted it, I took two clumps and shaped them into egg shapes.
My though process was that the larger egg would be the body and the smaller one would be the head. I thought I could just use a skewer to connect the head to the body. You'll also notice I cut out a beak and tail from cardboard and bent some paperclips to form legs.
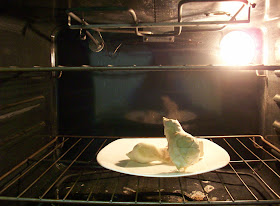
This is the end of the pictures documenting the salt dough sculpture because this is where things began to get frustrating. My plans were not working - the dough is very heavy and the paperclips could not support the weight of the body. Sigh. The head was also very heavy and dug the skewer deeper and deeper into the body until it fell apart. I kept going with my little bird and here is how he turned out. Not what was envisioned in my mind.
Immediately after shoving this one in the oven, I took a glob of leftover dough and started rolling it around. Please don't ask what I did next because when I came up for air, I was holding this sucker in my hand. Now, this is what I call success.
Oh, and speaking of oven, you should bake your salt dough creations on the lowest oven setting for 2-4 hours. My birds stayed in for 2 hours but had some wet spots still...which dried naturally overnight.
After my mixed salt dough results, I proceeded to get my hands dirty with some paper mache. I made a form out of crumpled newspaper in much the same way I tried my first salt dough bird...one larger egg shape with a smaller one for the head. I knew I wanted a cartoonish-figure to contrast against the more classic success bird above.
I took masking tape and wrapped it around to secure the newspaper into the shape I desired and then also attached the head.
I wasn't ready to give up on my desire to have a bird with legs so I cut a slit into the bottom of the body and slid the paperclip legs up in there. Then I took some small pieces of tape and taped between the legs to secure it in place.
The key was to keep bending the legs and toes to get the body perfectly balanced over the feet. I also cut out a beak and taped it on.
 |
| Isn't he cute? |
It is important to note that if you want a paper mache sculpture to last, you should only slather one or two layers of paper at a time and allow to dry between layers. This, along with the salt, minimizes risk of mold. I simply placed him on a plate with the salt dough birds on the warming setting of my oven.
 |
| So warm and toasty! |
After the paper mache bird is dry, I used fine grit sandpaper to lightly sand . He was then ready for another layer of goop. It is a long process, but I wanted my bird to stand the test of time, so I made sure it was completely dry between layers. I ended up doing four layers of paper and sanded in between each of them. This helped the paper to lay flat and minimized the roughness.
 |
| Good thing I had sandpaper - he is looking rough |
I ended up adding a tail at the last minute by layering several pieces of paper and then "glooping" it on. Of course, if you add a significant amount of weight to the body, you will need to tinker with the feet and rebalance the bird.
I think that I enjoyed making the paper mache birds more than the salt dough. I felt I was able to create different types of birds and personalities and had more control over the end product.
Now, I just need to figure out where to place my flock of birds.
I'm linking to:
Today's Creative Blog
Someday Crafts
Blue Cricket Design
Domestically Speaking
Paisley Passions
Katie's Nesting Spot
A Glimpse Inside
Somewhat Simple


How cute! I'm not sure which one I like best. Will Layla eat the salt dough ones? I think my dogs would. And I know exactly who you're talking about. :)
ReplyDeleteLove,
Mom
Those are so cute! What a great idea!
ReplyDeleteAnd I just wanted to thank you for commenting on my blogging tips post. I accidentally forgot to put one step in there for adding your email address so I wanted to let you know! Thanks!
http://adventuresofthemichelenafamily.blogspot.com/2011/03/blogging-tips.html
A burned-out light bulb makes a great base for a paper-mâché bird! I made one in a GS leader workshop years ago! We didn't use salt dough because of the Florida humidity.
ReplyDeleteI love the idea of recycling the bulb and using it as a base! Thanks - I'll have to brainstorm other uses for a light bulb.
ReplyDeletesuch cute peeps!
ReplyDeleteI am having 2 giveaways on my blog.
$38 + free shipping an any backpack from busy little hands etsy store
http://houseonashwelllane.blogspot.com/2011/03/38-store-credit-free-shipping-giveaway.html
$15 store credit from hair candy for girls.
http://houseonashwelllane.blogspot.com/2011/03/15-store-credit-giveaway-from-hair.html
All you have to do is leave a comment saying you want to win it.
These are still just too cute!! Thanks for linking them up! :)
ReplyDeleteHow whimsical! (I live for whimsical.) And adorable to boot.
ReplyDeletehttp://kidscatsclutterandklutz.blogspot.com/
I hope we all get one for Christmas! Sooooo cute.
ReplyDeleteSo cute. I love the blue one. I thought of painting the ones I did, but just kept them white. I may have to rethink my idea. Thanks for sharing this post with me.
ReplyDeleteAdorable! I too, have a small thing for birds. I did a post on my blog that made me realize just how many I have. Ahem, maybe it's less of a thing and more of an obsession. :o)
ReplyDeletewhy not find out more y6a72c1t40 replica louis vuitton bag replica bags and shoes why not try here j2e47y8w37 best replica designer replica bags hermes replica bags chicago gucci replica handbags a1k97c4n00 replica bags nancy
ReplyDeleteq3v65f3q27 z8z98w6a07 q5j81z1i08 t1e40z9a81 l6n05f9j15 d8y96x4r91
ReplyDeletep2s52z5n38 u4h11l1g50 r8j62p9v76 k4x84g0t64 n5i44x4k68 n6j28h4n87
ReplyDeletekd 14
ReplyDeleteoff white
travis scott jordan
off white shoes
goyard outlet
kyrie 5 spongebob
cheap jordan shoes
jordan shoes
jordan outlet
jordans shoes
hdss5136sja
ReplyDeletegolden goose outlet
golden goose outlet
golden goose outlet
golden goose outlet
golden goose outlet
golden goose outlet
golden goose outlet
golden goose outlet
golden goose outlet
golden goose outlet