Monday, May 2, 2011
Balcony Chandelier
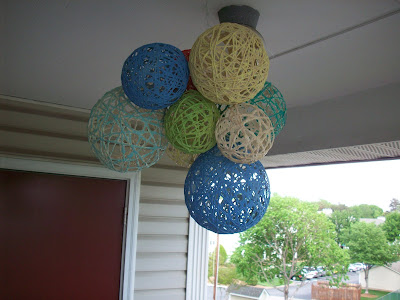
Today I'm going to be showing you my balcony chandelier. I have been cleaning up our balcony and preparing it for summer dinners, wine drinking evenings, and stargazing nights that will begin taking place as the weather warms up. This chandelier will bring life and party to my teeny tiny "backyard." Oh, and it follows my philosophy of easy, quick, and budget-friendly...I spent $0 on this little diy and I'm sure you have every material in your house, too!
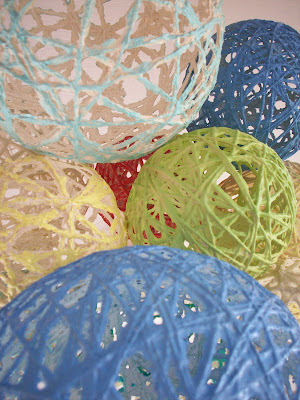
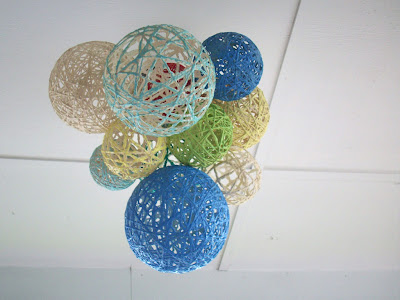
My chandelier is made up of eleven different sizes of string lanterns in a variety of fun colors that have been grouped together to hang from the center of the balcony ceiling. Are you ready to see some exciting and educational pictures that depict the crafting mania that surrounded the chandelier? I thought so!
This entire messy project can be summed up as paper mache with string. Notice I mentioned messy. I think this project was the messiest project I have partaken in (well, besides the oil-based primer nightmare that I don't like to think about)...so beware! To make the ooey gooey paste, you will need to mix together two cups of flour, 1/2 cup of elmers glue, 1/2 cup corn starch, and enough water to make a thick but slightly watery paste. Remember, the flour is what will be the main character in creating a rock solid lantern so don't water it down too much.
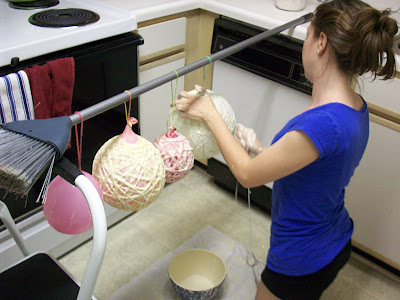
The next step is to hang blown up balloons somewhere where you can make a mess. I hung them from a broom that was balanced on a stool and the kitchen counter. Here comes the very first messy step: you will need to coat the balloons with either petroleum jelly (did this for my first batch and turned out well) or cooking spray (did this for my third batch and it worked excellent). This step ensures that the rock solid paste only sticks to the yarn/twine and not the balloon. I skipped this step on my second batch and bad things happened once it had dried.
Now, grab your string/twine/yarn and start dipping into your mixture and wrapping. I found that I could put a handful of twine in the bowl at a time, swish it around, and slowly wrap without creating a knot. I started winding top to bottom until I worked my way around the balloon, and then wrapped side to side. Feel free to wrap as much or as little as you'd like. I did a variety of amount of yarn and each lantern came out beautifully.
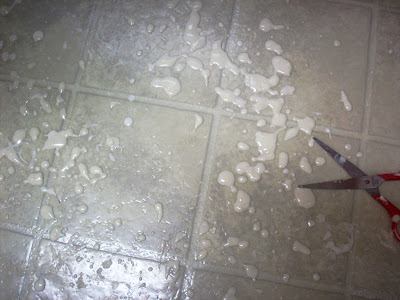
Like I said before: you will make a mess. Even if you put down cardboard or a trash bag or your dog, splashes of ooey gooey gunk will splatter on your counters, your floor, your legs, and even your hair.
Now comes the hard part - let it dry for 24 hours. This does not mean 12 hours (I tried) nor does it mean 19 hours (I tried this, too). The longer you wait, the stronger your lantern will be. When I messed with it too soon more bad things happened.
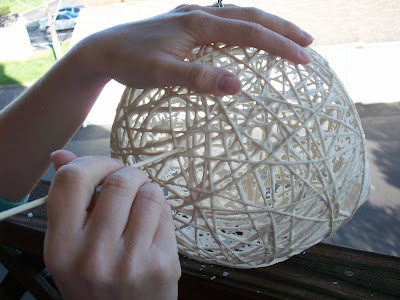
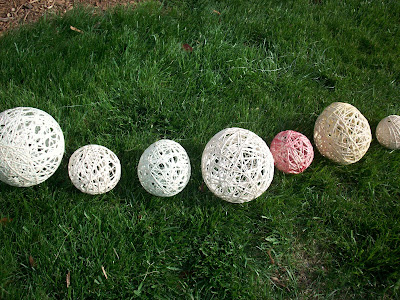
After your 24 hour drying time, you get to pop the balloon! Do this outside because when you pop it, shards of dried ooey gooey hard stuff will explode like a party with confetti. The following step is my husband's favorite: use your finger or a stick or a small knife and start poking the dried crystalized goop that formed between the yarn. Oh, and look below for a show and tell of what happens when you don't use an oily coating on the balloons. Told you - bad stuff.
Next, spray the lanterns with a clear protective coating; I used Rustoleum Clear Coating Spray.
In order to create a chandelier out of the lanterns, I tied fishing line to each one, knotted them together just so and hung them from a hook in our ceiling. Holding them up in front of our mirror to see how they looked was a lot easier than getting on and off our step ladder to view the mess of lanterns, just fyi.
I think all white lanterns would make a beautiful chandelier, but I wanted a festive feeling for our balcony so I made mine with colors reflected in our potted garden. Colored yarn worked well but created a muted color even when the original yarn was bold and loud. Spray painting and using craft paint worked well also and resulted in bolder colors. The two white lanterns you see are the natural twine color.
One last piece of advice - make more lanterns than you think you'll need. I started with just five and they looked pitiful. I made another three but even eight didn't create the focal point I was looking for. Eleven was the magic number.
I can't wait to finish up our balcony projects so we can relax and enjoy the summer from our little teeny "backyard".
Editorial Note: Here's yet another big THANK YOU to Jessica for having me over at My World - Made By Hand!
To see a list of who I regularly link to, including Today's Creative Blog, please visit Into Our Linky Parties
Labels:
budget craft,
chandelier,
craft,
diy,
paper mache,
tutorial
Subscribe to:
Post Comments (Atom)




52 comments:
I LOVE this - so cute and colorful!
~Jessa
www.jessajill.blogspot.com
What an cool project... this would look great on our patio. Thanks.
So cute! I'm sure all your neighbors are jealous.
Thanks for linking back to me :)
Impressive! You did a great job!
This looks like so much fun to have on a porch or anywhere for that matter! Love the colors you used too! Great job!
I LOVE IT! This is such a fun and playful light! It turned out so cute!
This is so cute and love the colors. Great job.
Wow this is so neat and original! Love the finished product.
Ohmygoodness. Look how beautiful! It looks like hard work, but the payoff is so awesome!
Oh my goodness. I love this idea!
Megan
mommyminded.blogspot.com
Very cool, I am not up to that much of a mess right now, but maybe a good summer project for the kids:)
That is so neat! I've never seen anything like it before--really, really cool!
Rachel @ Maybe Matilda
obsessed with this! definitely going in the future projects file :)
Jackie
http://jaclyndesigns.blogspot.com
This is so cool! So much work and what a mess, but it's all worth it when you see that finished piece!
Awesome project! Love that you painted them bright and summery colors :)
Jill @ JunkyVagabond
The colors are beautiful together! Great job
What a gorgeous look!! I would love it if you would link this up to my Marvelous Mess party....each week I pick one project to feature on my sidebar!! Here is the link: http://marvelouslymessy.blogspot.com/2011/05/marvelous-mess-11.html
Super cute - this would be fun for a nursery as well! Love the colors you used.
So pretty! Please stop by www.laughloveandcraft.com and link up to my Share the Wealth Wednesday Link Party! I'm your newest follower!
I've always wanted to try these! that's so cool.
kathryn
www.thedragonsfairytail.blogspot.com
What great project. I can't wait to try this.
SO fun and colorful! Great idea!
So cute and fun!! I want to try something like this this summer :)
Thanks for linking up to Your Whims Wednesday!
I just love this! I'm thinking this would be a great project for these crummy, cold, damp days we're having when it's SUPPOSED to be getting warm! I bet these would look very pretty with the tiny white lites in them too! Great tutorial and thanks for all of the hints!
These turned out awesome! i`ve been looking for a way to do these without fabric stiffener. Thanks for sharing!!
that is flippin' awesome!
Thanks for linking to Take-A-Look Tuesday - I featured you today! - Mandy, www.SugarBeeCrafts.com
Fun project! Since I was a child every Easter I make large eggs using this technique, but I have never seen this project done in any other way. How creative!!!
Those turned out awesome. I had the same problem as you when making a yarn ball...I am so impatient that I didn't wait 24 hours and they completely deflated!
Would love for you to join my linky party! :)
http://www.inspiringcreationsblog.com/2011/05/friday-favorites-linky-party.html
Wow! This turned out awesome! Love it!
Thank you so much for linking up to {nifty thrifty sunday}!
I hope to see you again this week! :)
xoxo,
Vanessa @ {nifty thrifty things}
I am totally inspired by this project. :-) Thanks for linking up to my Marvelous Mess party. I wanted to let you know that I will be featuring this project prominently on my sidebar for a week!! Here is the link if you want to check it out (and grab a button!!): http://marvelouslymessy.blogspot.com/2011/05/marvelous-mess-11-features.html
This would even look great for a ceiling or naked corner...
Thanks for linking to Creative Juice. Hope to see you back again this week...
These are fabulous! Can't wait to try... :)
Thanks so much for the useful tips that you have shared at every stage of the making...
those are awesome!!!!
Hey girl...I'm so excited for you! I knew the minute I saw this tutorial that it'd be a hit! Great work...
These turned out awesome!! LOVE the fun colors!
Amy and Emily
www.Sistersofthewildwest.blogspot.com
I remember doing this string art stuff as a kid...but you took it that concept to an exceptional level - gorgeous!
This looks like a cool idea. I love all the pics from below looking up....just not sure about how it looks from a distance in daylight. Will you be posting pics of how it looks at night all light up? I mean, that is the purpose right?! Kinda key to have that pic. Thx!
P.s. - sorry for the tude....I'm new in menopause, its hot as hell here, cant run a/c due to majorlack fires all around..so hot flashes are making me a mad...mad...girl!
Very lovely and thanks for sharing the recipe of that batter... otherwise I though of only glue... they looked so lovely
please visit me if you can
http://craftaworld.blogspot.com/
Love
Farah
hi!
im nana from Malaysia.. ;)
check out my tutorial for this nest lantern.
http://nanarez.blogspot.com/2011/06/diy-nest-lantern.html
much more easy and less messy ;) i mean u can hardly see the glue..
have a try.
:D
-nanarez-
adding to my 'must try' list! thanks for the inspiration!
michael
bluevelvetchair.blogspot.com
This is so clever and so lovely!!!!
ladeedacreations.com
This is by far the best tutorial I've seen for string lanterns and the glue mixture is perfect. Thank you so much!
When I started running out of the mixture, I added more glue and some cornstarch to thicken and it worked well. Then, when I needed to take a break, I covered the mixture with saran wrap to keep it moist.
I love this idea! I made smaller ones and put ornament hooks on them for my christmas tree. Then I made large ones and put christmas lights in there and some pointsettas inside made a wonderful christmas decoration:-)
Hi Kristen, just wanted you to know I pinned your DIY string chandeliers on to PInterest and it has had so many re-pins. people love the string chandeliers! I tried it - messy process, but beautiful outcome! Thanks for sharing and inspiring.
www0912
fitflops clearance
canada goose outlet
fitflops clearance
ralph lauren
dsquared2
hermes belt
nhl jersey
nike shoes
ralph lauren polo
kate spade handbags
buy replica bags h00 z5f07p6r81 gucci replica handbags a65 h0j73b0m81 replica ysl handbags o19 b9s02g3k87
yeezy shoes
hermes outlet
yeezy 350
goyard store
nike sb
kd shoes
fear of god outlet
jordan outlet
supreme new york
supreme new york
fbgey2inj5
supreme outlet
golden goose outlet
golden goose outlet
golden goose outlet
golden goose outlet
golden goose outlet
golden goose outlet
golden goose outlet
golden goose outlet
golden goose outlet
Post a Comment